
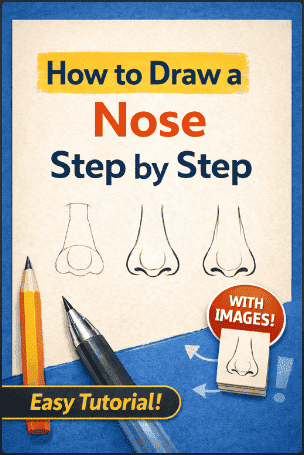
How to Draw a Nose Step by Step for Beginners?
If you’re trying to learn how to draw a nose step by step, you’re in the right article.
Drawing a nose feels difficult at first because most beginners try to copy outlines instead of understanding structure.
If your drawings look unrealistic or flat, the issue usually comes from missing simple shapes and light shading, not a lack of talent.
In this article, you will learn how to draw a nose step by step using a simple method that works for beginners.
The focus stays on basic forms, clean construction, and controlled shading. You do not need advanced skills to follow along.
This tutorial is based on practical drawing fundamentals used by artists. You will start with simple shapes, build the form gradually, and then add light and shadow to create depth.
By the end of this article tutorial, you will understand how a nose is constructed, not just how to copy one.
Each step is short and straight to the point, so you can practice without feeling overwhelmed. If you follow the process and repeat it a few times, your results will improve fast.
Note: Some links in this article are affiliate links.
Supplies You need to draw a Nose
Before you start nose drawing, make sure you have a few basic tools ready. Using the right materials helps you stay focused and makes each step easier to follow.
You do not need expensive supplies. Simple tools work well for this nose exercise. Here are some supplies you need:
Pencil (HB or 2B): Use an HB pencil for light sketching and a 2B pencil for shading. These give you better control over lines and tones.
Eraser: A standard eraser helps you clean up guidelines and adjust shapes. You will use it often while refining the drawing.
Paper: Any smooth drawing paper works fine. Avoid rough surfaces because they make shading harder to control.
Blending tool (optional): You can use a blending stump, tissue, or even your finger to soften shading. This step helps create a smoother and more realistic look.
Once you have these ready, you can move to the first step and start building the nose using simple shapes.
Understand the Basic Structure of a Nose
Before you draw, break the nose into simple forms. This helps you place shapes correctly and avoid overcomplicating the process.
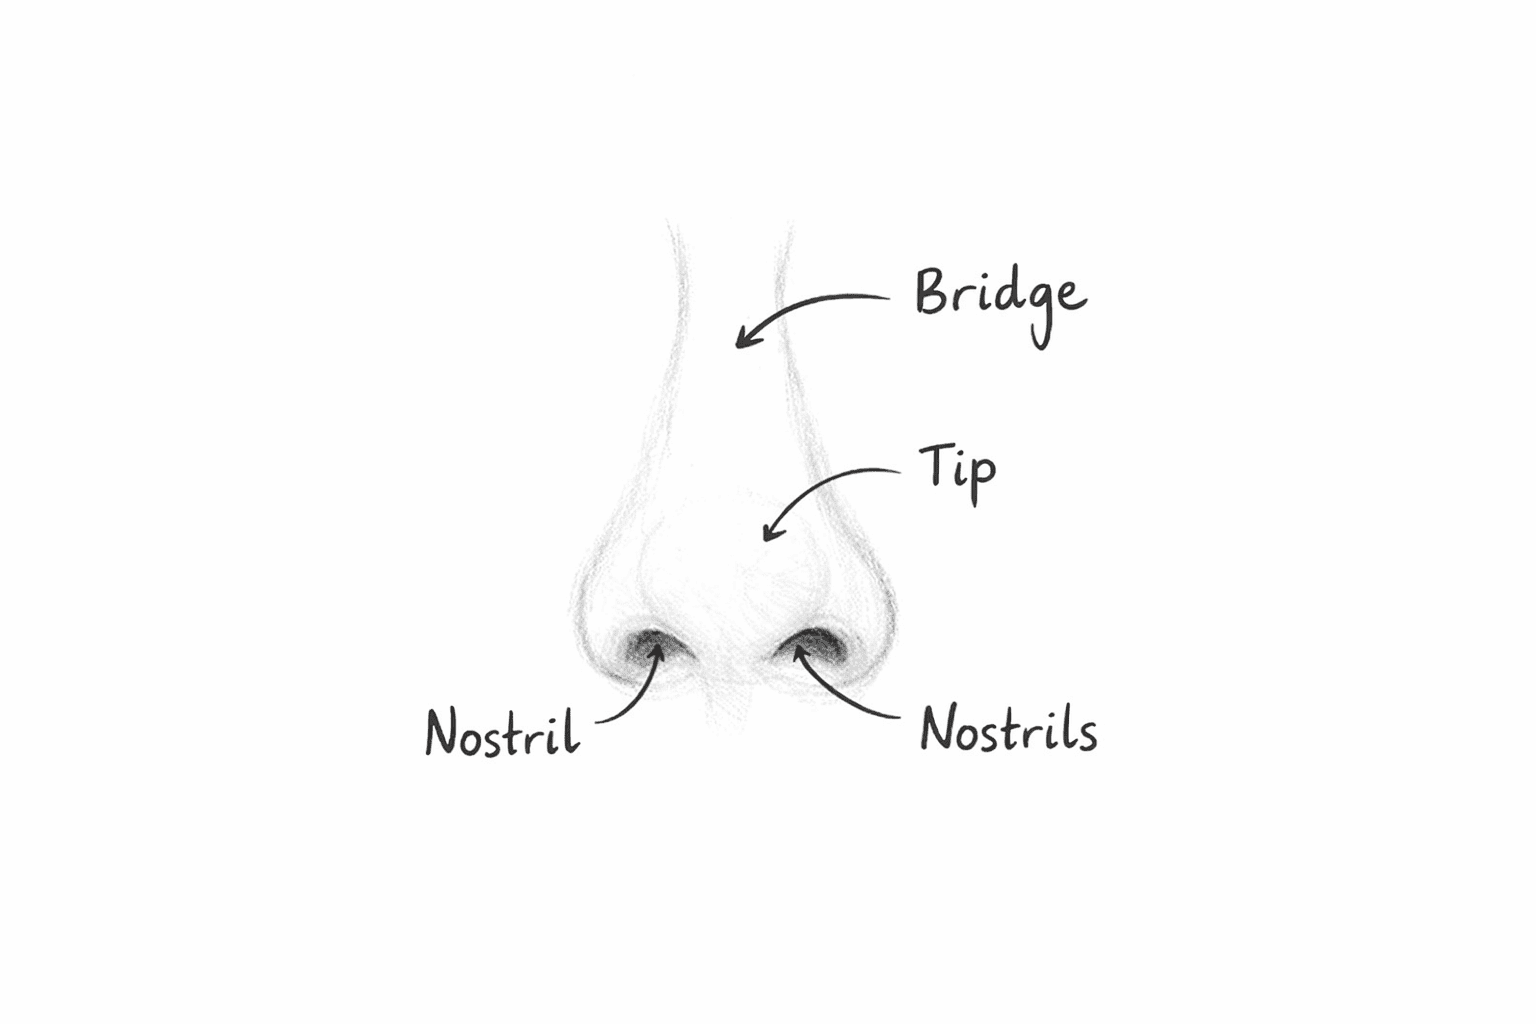
Focus on how each part connects rather than on small details. Here are some essential parts of the nose:
Bridge: The bridge runs from between the eyes down to the tip. It looks like a soft plane rather than a hard line and is often shown with light shading.
Tip: The tip is the rounded front part of the nose. Think of it as a small oval or sphere to guide your shading.
Nostrils: The nostrils sit below the tip and curve outward. They are soft shapes that blend into the nose, not sharp outlines.
When you see the nose as these simple parts, drawing becomes more controlled and easier to repeat.
Related blog post: How to Draw a Face Step by Step?
How to Draw a Nose Step by Step
In this section, you will learn how to draw a nose step by step using a simple method. Each step builds on the previous one, so you can follow along without confusion.
Here are the steps you need to follow to draw a nose:
Step 1: Start With Simple Shapes
First, look at the nose as a group of basic forms instead of a detailed facial feature. This makes the process easier and helps you stay accurate from the beginning.
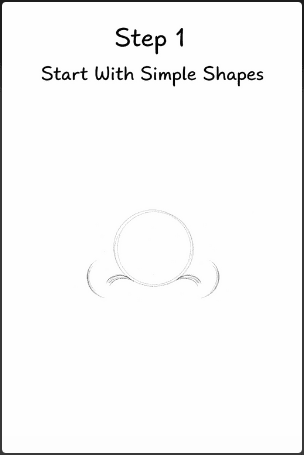
Draw a small circle or oval for the tip of the nose. Then add two short curved marks on each side to show where the nostrils will sit. Above the circle, sketch a light vertical shape to mark the bridge.
Keep your lines soft and loose at this stage. Do not press hard with your pencil because you will need to adjust the shapes as you move forward.
Beginners often rush into details too early. This leads to uneven features. When you begin with simple shapes, you give yourself a clear guide for the rest of the drawing.
Step 2: Place the Bridge and Sides of the Nose
Next, build the structure around the center shape. Draw two light lines moving upward from the tip area to suggest the bridge of the nose.
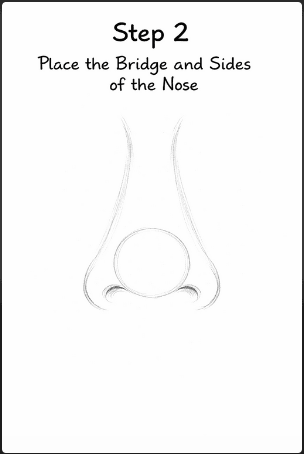
These lines should not be dark or sharp. In most drawings, the sides of the nose are defined more by shading than by strong outlines, so keep the edges gentle.
At the same time, pay attention to the width. If the bridge is too narrow, the nose may look pinched. If it is too wide, the nose may lose its natural proportion.
Compare the width of the bridge to the tip and nostrils so the whole form looks balanced. This step gives the nose its main framework and prepares you for adding depth later.
Step 3: Draw the Nostrils and Bottom Plane
Now focus on the lower part of the nose. Draw the nostrils as soft shapes instead of hard black holes. They usually sit slightly below the tip and angle outward.
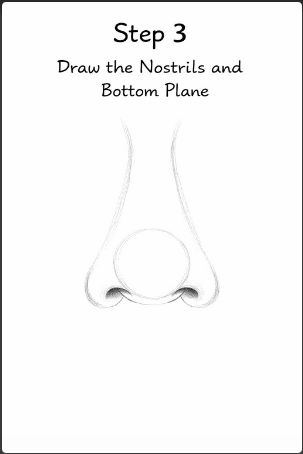
Then connect the nostrils to the tip with light curved lines to suggest the bottom plane of the nose. This area helps show how the nose projects from the face.
Many beginners make the nostrils too dark or too large, which makes the drawing look stiff. Try to keep the shapes small and natural. Look at how the nostrils relate to the center of the nose and to each other.
They should feel connected to the form, not placed as separate marks. A softer approach gives you a more realistic result.
Related blog post: How to Draw Lips Step By Step?
Step 4: Refine the Overall Shape
Once the main parts are in place, clean up the outline and refine the shape. Adjust the tip if it looks too round or too sharp. You need to smooth out the sides of the nose so they flow naturally into the bridge.
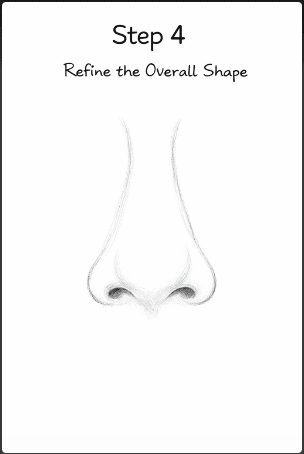
Check the spacing between the nostrils and make small corrections where needed. This is where the drawing starts to feel more solid and believable.
Take a moment to compare all parts of the nose before moving on.
Ask yourself if the tip sits in the center, if the nostrils match the angle of the nose, and if the bridge feels straight or slightly curved based on the style you want.
Small corrections here save time later and make the shading process much easier.
Step 5: Add Light Shading to Show Form
Shading is what makes a nose look three-dimensional. Start by finding the shadow areas. In most cases, the darkest parts appear inside the nostrils.
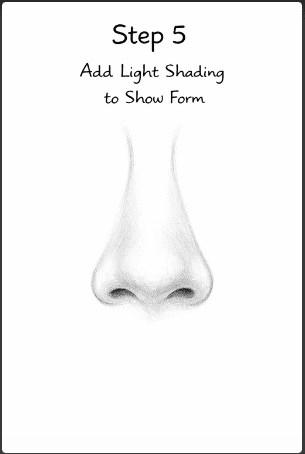
Also, they appear under the tip and along one side of the nose, depending on the light source. So use light pencil pressure and build the tone slowly. This gives you more control and keeps the drawing clean.
Leave the bridge and the top of the tip lighter so they catch the light. This contrast helps the nose stand out without using heavy outlines.
Think of shading as a way to describe the surface turning in space. When you add shadow with care, the nose begins to look rounded and natural instead of flat.
Step 6: Blend and Soften the Transitions
After placing your first layer of shading, soften the transitions between light and dark areas. You want the tones to flow smoothly across the surface of the nose.

Use a blending stump, tissue, or soft pencil strokes to reduce harsh edges. This works well around the tip, the nostrils, and the sides of the bridge.
Be careful not to blend everything into one flat tone. You still need clear light areas, mid-tones, and darker shadows.
Good blending does not erase contrast. It helps the forms look smoother and more realistic. For beginners, this step often makes the biggest difference in the final result.
Step 7: Clean Up and Add Final Details
At this stage, erase any guidelines that still show through the drawing. Then refine the shadows, sharpen the parts that need more definition, and soften any areas that look too harsh.
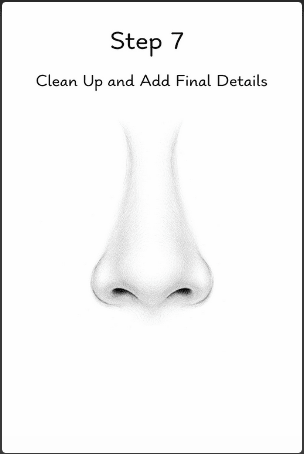
If one nostril looks darker than the other for no reason, fix it now. If the tip looks uneven, reshape it with light strokes.
Finish by stepping back and checking the whole nose as one form. Do not focus only on one small area. Because a good drawing depends on balance across the full feature.
When the shapes, shading, and proportions work together, the nose will look much stronger. This final check helps you catch small issues before you move on.
Related blog post: How to Draw Eyes Step by Step?
Step 8: Practice the Same Process From Different Angles
Once you understand the front view, repeat the same method from the side view and the three-quarter view. Begin with simple shapes, place the nostrils, refine the structure, and then shade the form.
The process stays the same, even when the angle changes. This helps you build real drawing skills instead of memorizing one version.
Practicing different angles also trains your eye to understand the nose as a three-dimensional form. Over time, you will notice patterns in light, shape, and placement.
This makes future drawings easier and more accurate. If you want steady improvement, repeat these steps often and keep your sketches simple at first.
Common Nose Drawing Mistakes to Avoid
Even if you follow the steps, small mistakes can make your drawing look stiff or unrealistic. When you know what to avoid, you improve faster and get better results with less effort.
Here are some mistakes to avoid:
Drawing hard outlines: Avoid dark lines around the nose. Use soft shading to define the form.
Making nostrils too dark: Do not fill them in completely. Keep them soft and build the darkness gradually.
Ignoring the light source: Choose one light direction. Keep one side lighter and the other slightly darker.
Drawing everything symmetrical: Do not aim for perfect symmetry. Small differences make the nose look more natural.
If you stay aware of these mistakes while drawing, your results will look cleaner and more realistic with less effort.
Conclusion
Learning how to draw a nose becomes easier when you follow a clear process. You can start with simple shapes, build the structure, and then add shading step by step.
This method helps you stay accurate and avoid common mistakes.
Keep practicing regularly and focus on small improvements each time. When you master the basics, your drawings will look more natural and more confident.
More blog posts:


Frequently Asked Questions
How do you draw a nose easily?
To draw a nose, you need to start with simple shapes instead of details. Use a circle or oval for the tip, then place light lines for the bridge and nostrils.
Keep your lines soft and build the drawing step by step. This approach helps you stay accurate and avoid mistakes early.
Practice this method a few times using light sketches. Focus on placement first, then add shading. When you repeat the same process, drawing a nose becomes easier and more natural.
Why does my nose drawing look flat?
A nose looks flat when there is not enough contrast between light and shadow. If everything has the same tone, the form will not stand out. You need clear light areas, mid-tones, and darker shadows to show depth.
Also, check your edges. If you rely only on outlines, the nose will not look three-dimensional. Use shading to define the form instead of drawing hard lines.
How do you shade a nose correctly?
To shade a nose, start by choosing a light source. Then shade the areas under the tip, inside the nostrils, and along one side of the nose. Use light pressure and build the shading gradually so you stay in control.
Keep the bridge and top of the tip lighter. Blend softly to create smooth transitions, but keep enough contrast so the nose does not look flat. Clean shading makes the drawing look more realistic.
How long does it take to get good at drawing noses?
Progress depends on how often you practice. If you draw a few noses each day, you will see improvement within a week. Focus on repeating the same steps instead of trying new techniques each time.
Consistency matters more than long sessions. Short, focused practice helps you understand shapes, proportions, and shading faster.