
How to Draw Eyes Step by Step? Easy Tutorial
If you want to learn how to draw eyes step by step, you are in the right place. Many beginners struggle with drawing eyes because small mistakes change the whole expression.
The good news is you do not need advanced skills to draw a realistic eye. You only need a clear process and a few simple shapes.
In this beginner-friendly tutorial, you will learn how to build the eye from a basic outline. We will also show you how to place the iris and pupil correctly. Each step is simple and easy to follow, even if you are drawing for the first time.
By the end, you will know exactly what to draw first, what to add next, and how to avoid the most common mistakes that make eyes look bad. So grab a pencil and paper to start with step one.
Simple Tools You Need to Start Drawing Eyes
You do not need expensive supplies to learn how to draw eyes step by step. You can start with a few basic tools. Focus on control and clean lines.
Here are some things you might need:
HB Pencil: Use an HB pencil for your first sketch. It creates light lines that are easy to erase. Draw the eye shape, iris, and eyelids with light pressure.
2B Pencil: Use a 2B pencil to add darker areas. Shade the pupil and soft shadows under the upper eyelid. If you only have one pencil, press lightly for soft lines and harder for dark areas.
Eraser: Use a regular eraser to clean edges. A kneaded eraser works well for lifting small highlights inside the iris.
Plain Paper: Choose smooth paper. Smooth paper helps you control shading and keep lines clean.
Tissue or Blending Stump(Optional): Use a tissue or blending stump to soften shading. Blend gently around the iris and eyelids. Avoid overblending so your drawing keeps detail.
Related blog post: How to Draw Tears in the Eyes?
How to Draw Eyes Step By Step
Learning how to draw eyes step by step becomes much easier when you follow a clear order. Instead of guessing where to start, you will build the eye one simple part at a time.
In the steps below, you will begin with a basic shape, then add details and light shading to create a clean result.
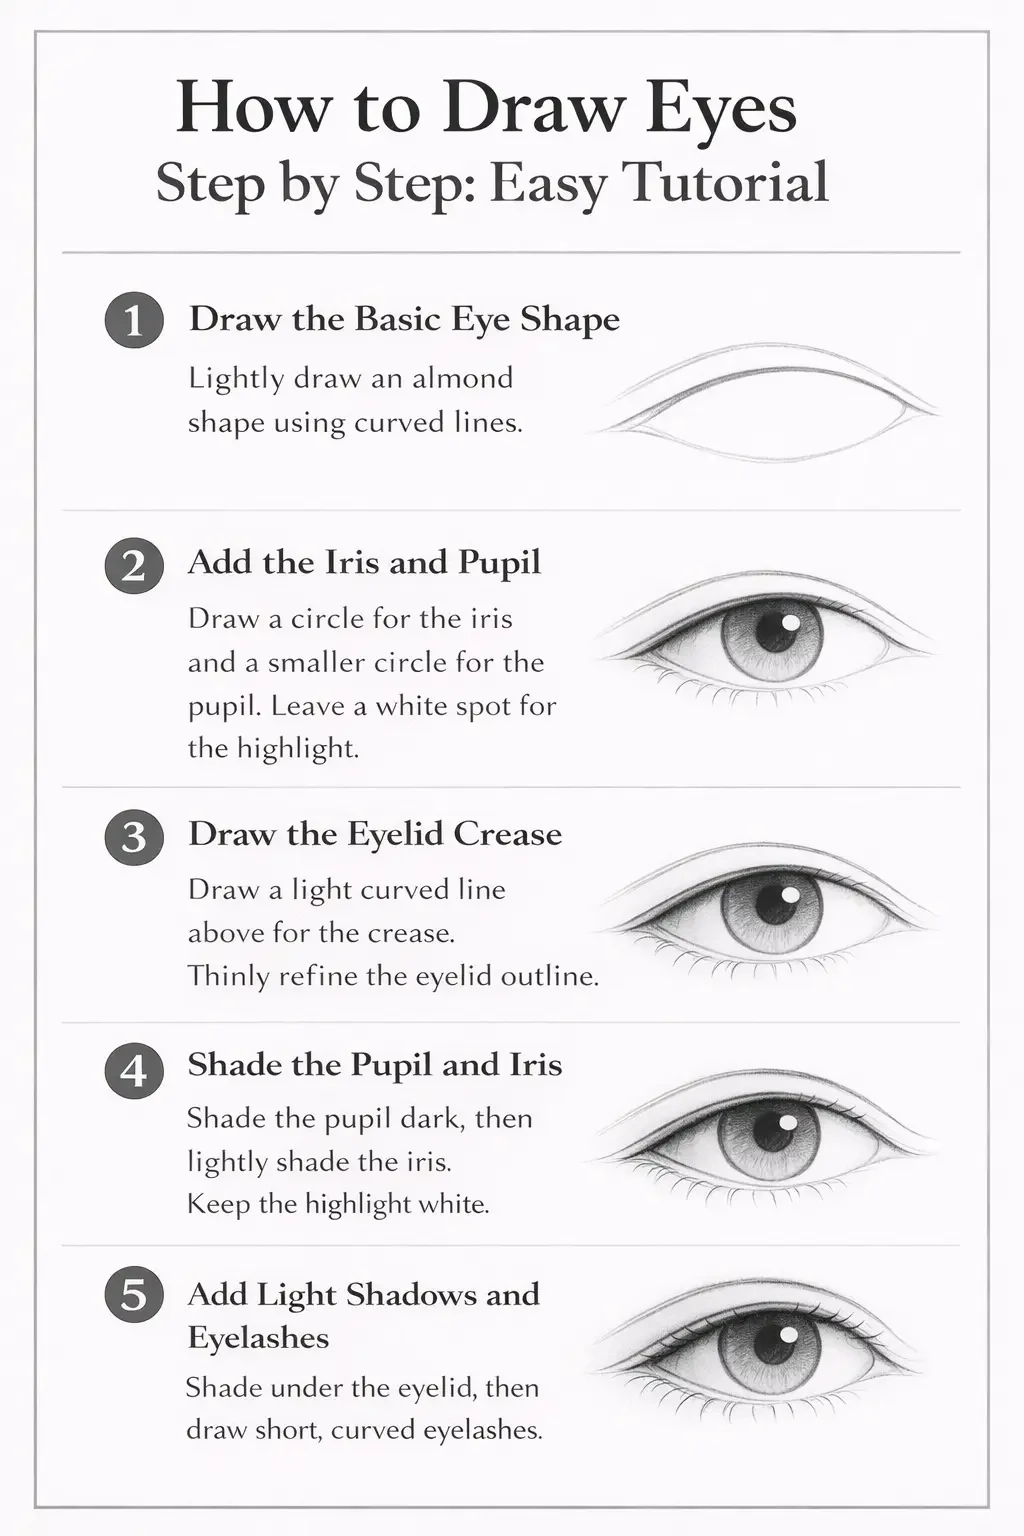
Step 1: Draw the Basic Eye Shape
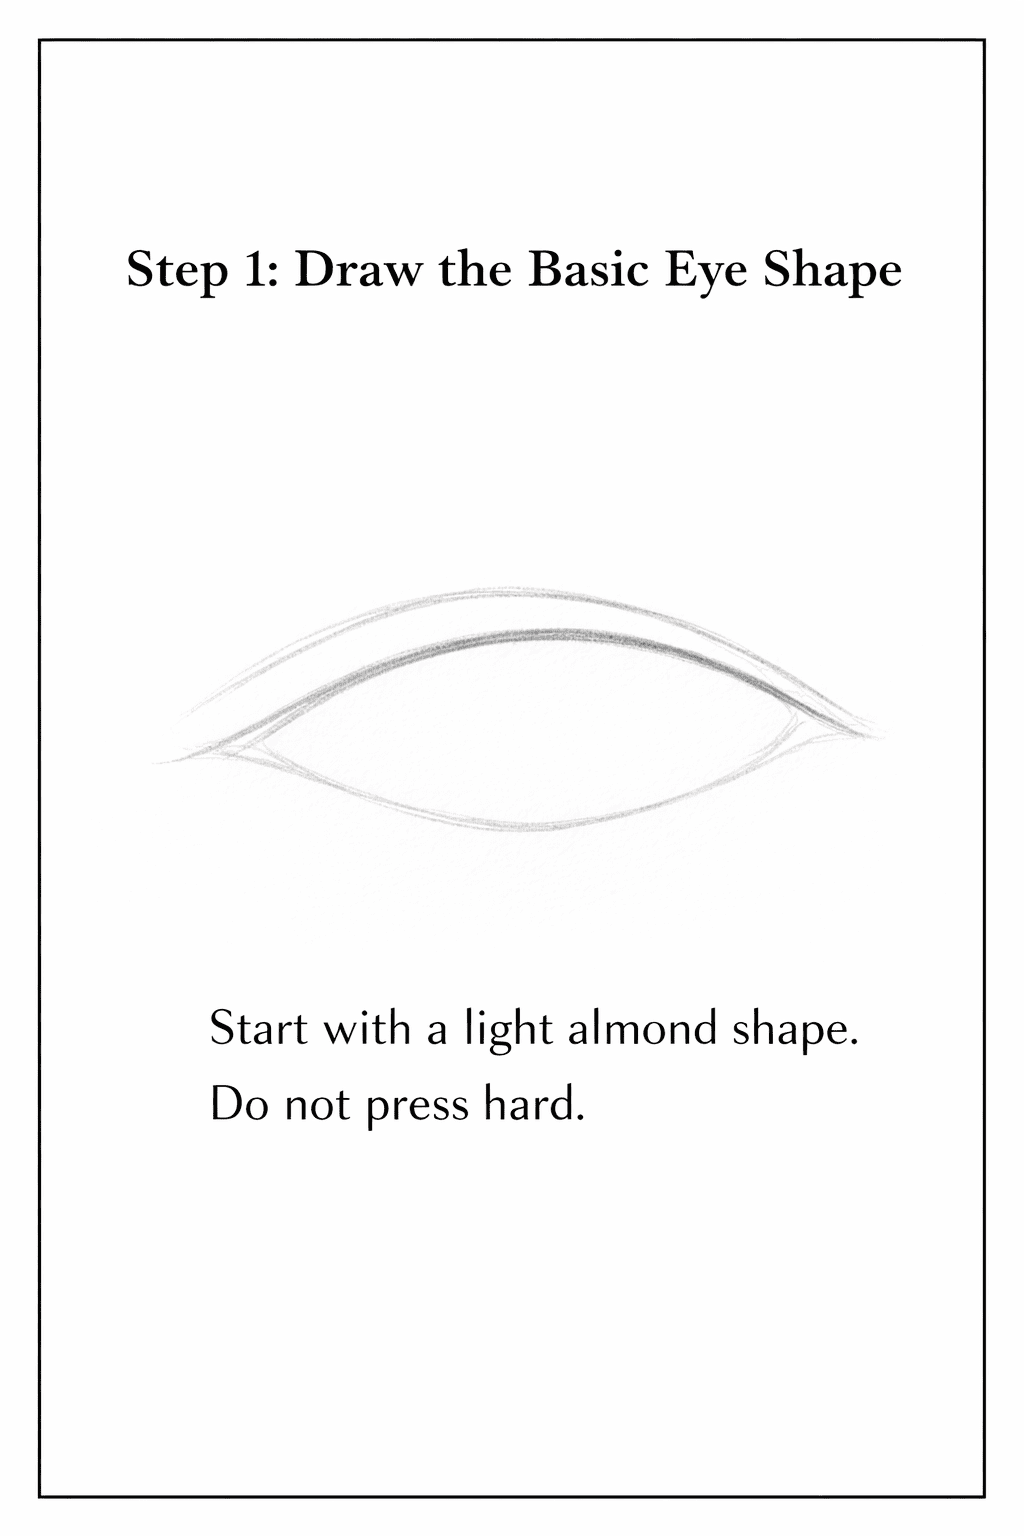
Start with a light almond shape. Draw one curved line for the upper eyelid and a softer curved line for the lower eyelid. The top curve should be slightly more arched than the bottom one. Keep both ends slightly pointed, but not sharp.
Use light pressure with your pencil. If the shape looks too wide or too flat, adjust it before moving forward.
At this stage, focus only on the outline. Do not add details yet. A clean and simple shape makes the next steps easier.
Step 2: Add the Iris and Pupil
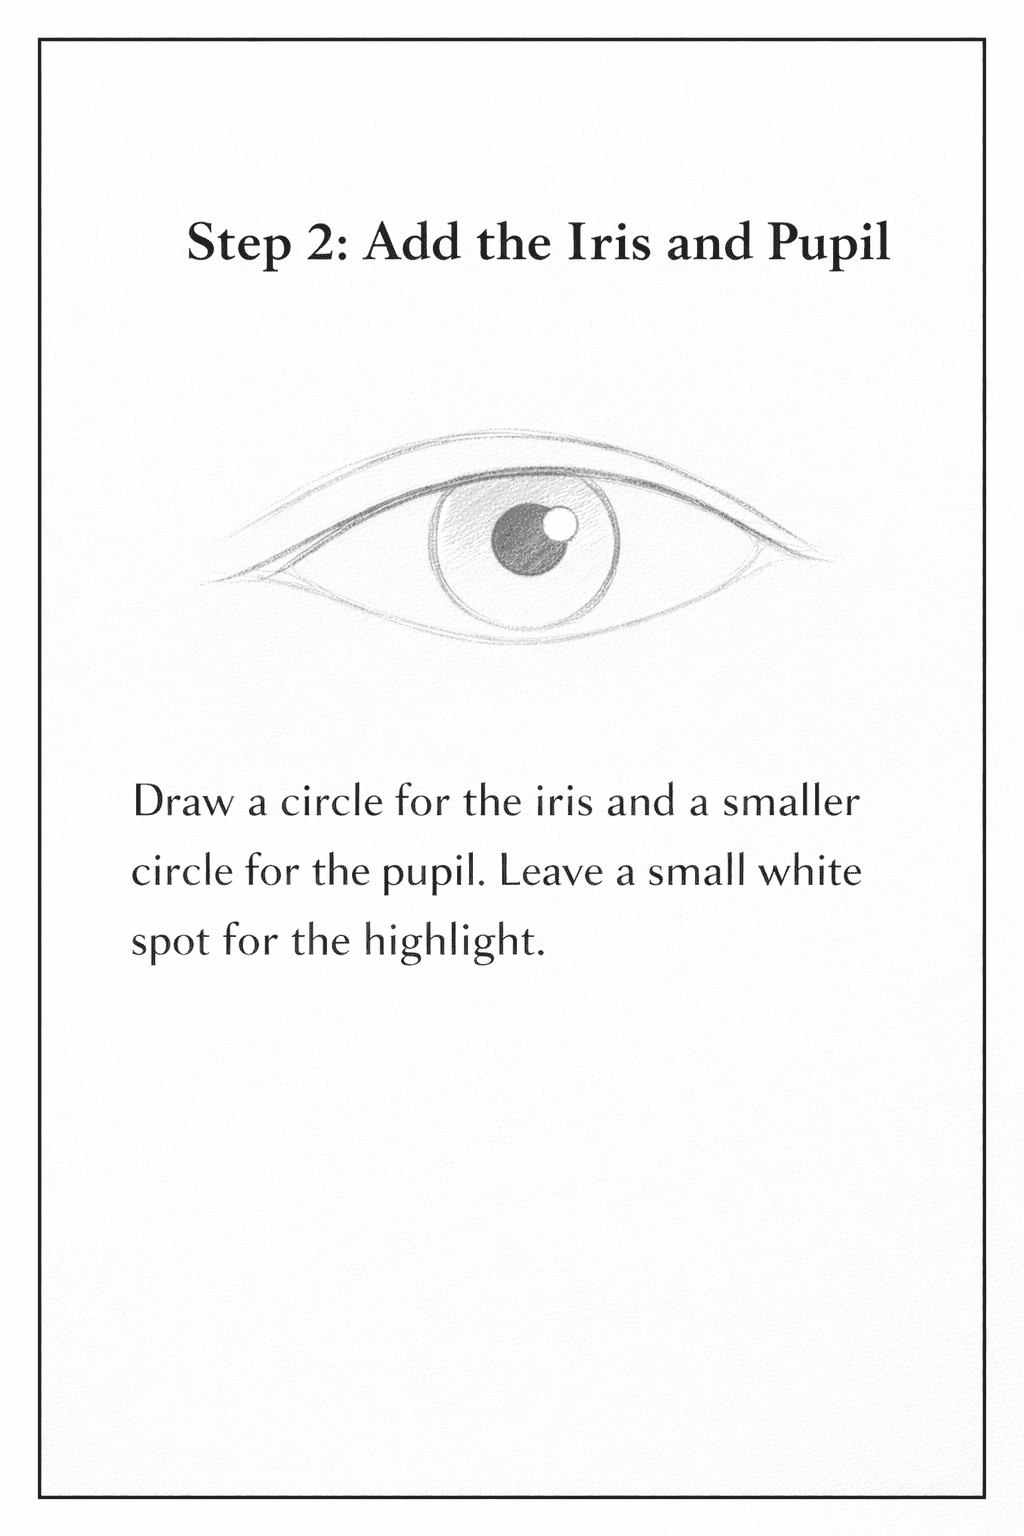
Inside the eye shape, draw a circle for the iris. Do not draw the full circle floating inside. Let the top and bottom eyelids slightly cover it. This small overlap makes the drawing look more natural.
Now draw a smaller circle in the center for the pupil. Leave a small blank spot inside the iris for the highlight. This tiny white area will help the eye look alive once you start shading.
Keep your lines soft. You can darken them later.
Step 3: Draw the Eyelid Crease and Define the Outline
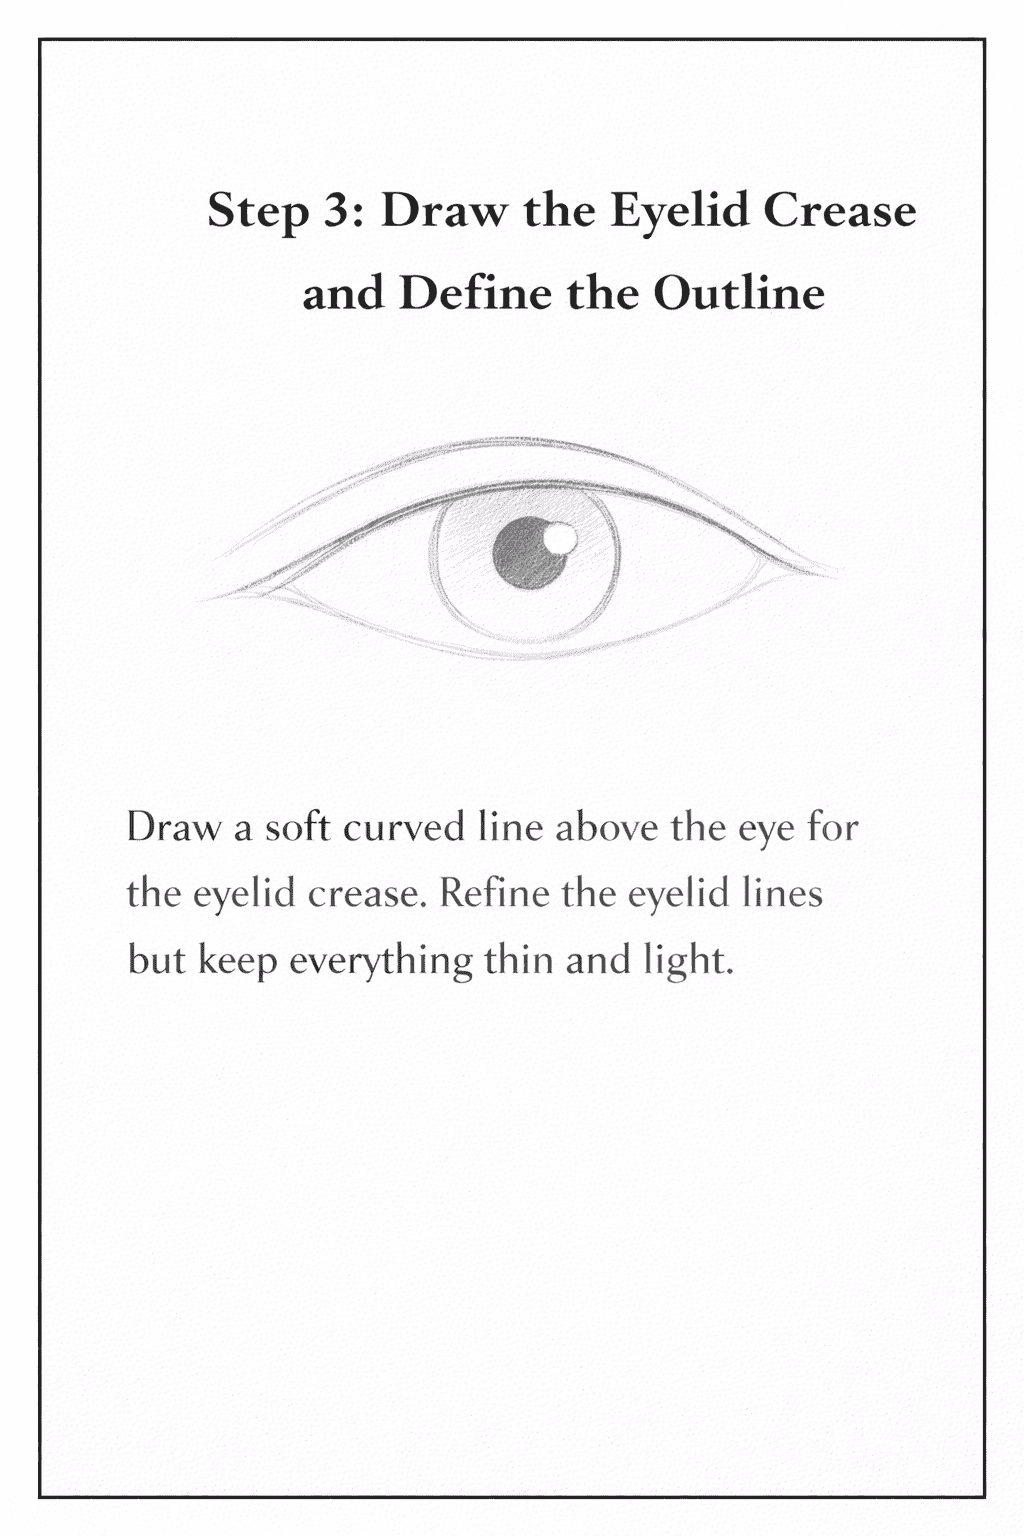
Above the upper eyelid, draw a soft curved line that follows the shape of the eye. This is the eyelid crease. Keep it thin and light.
You can slightly refine the upper and lower eyelid lines at this stage. Make the top lid a little thicker than the bottom lid. Do not make the lines too dark. You are still building the structure.
Take a moment to check proportions. The iris should sit centered between the left and right corners of the eye.
Step 4: Shade the Pupil and Iris
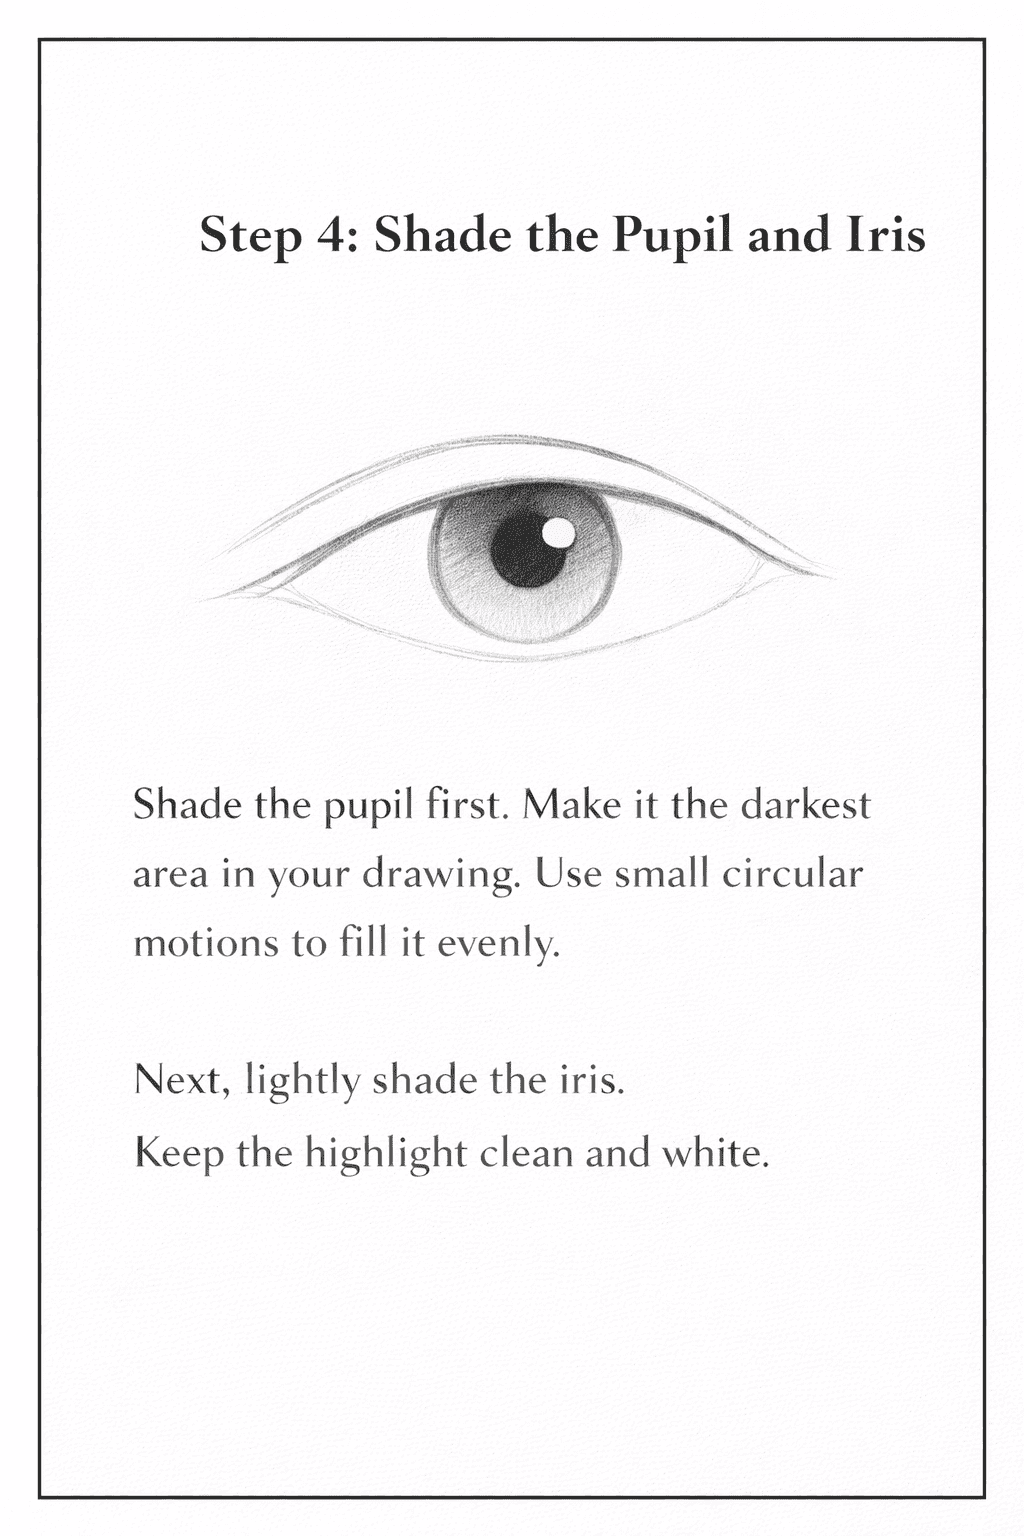
Shade the pupil first. Make it the darkest area in your drawing. Use small circular motions to fill it evenly.
Next, lightly shade the iris. Add soft lines that move outward from the pupil to the edge of the iris. Keep the highlight area clean and white. You can darken the outer edge of the iris slightly to create depth.
Do not overwork the shading. Keep it simple and even.
Step 5: Add Light Shadows and Eyelashes

Add a soft shadow under the upper eyelid. This shadow makes the eye look more realistic because the lid blocks light from the top.
Lightly shade the corners of the eye. Keep the white of the eye light, not dark.
Finally, draw simple eyelashes. Use short curved strokes. Start from the eyelid line and flick your pencil outward. Do not draw too many lashes. A few natural strokes look better than heavy lines.
Now your beginner eye drawing is complete. Practice these five steps several times to improve your control and accuracy.
Related blog post: How to Draw Lips? Step-by-step Tutorial.
Common Mistakes When Learning How to Draw Eyes
When you learn how to draw eyes step by step, small mistakes can change the whole expression. If your drawing looks flat or unnatural, one of these issues is often the reason.
Drawing the iris as a full circle: Beginners often draw the iris as a complete circle inside the eye. In real eyes, the upper eyelid usually covers a small part of the iris. Let the lid overlap slightly to make the eye look natural.
Pressing too hard with the pencil: Dark and heavy lines make your drawing look stiff. Start with light pressure so you can adjust the shape easily. Darken only after you feel confident with the structure.
Making the white of the eye pure white: The eyeball is not bright white. Add a soft shadow under the upper eyelid to create depth. This small detail makes a big difference.
Adding too many eyelashes: Drawing thick or crowded lashes makes the eye look messy. Use short curved strokes and leave space between them. A few natural lashes look better than many heavy lines.
Ignoring proportions: If the eye looks too wide or too tall, check the shape before adding details. Fix the structure first. Good proportions make shading and details much easier.
Easy Side View Eye Drawing for Beginners
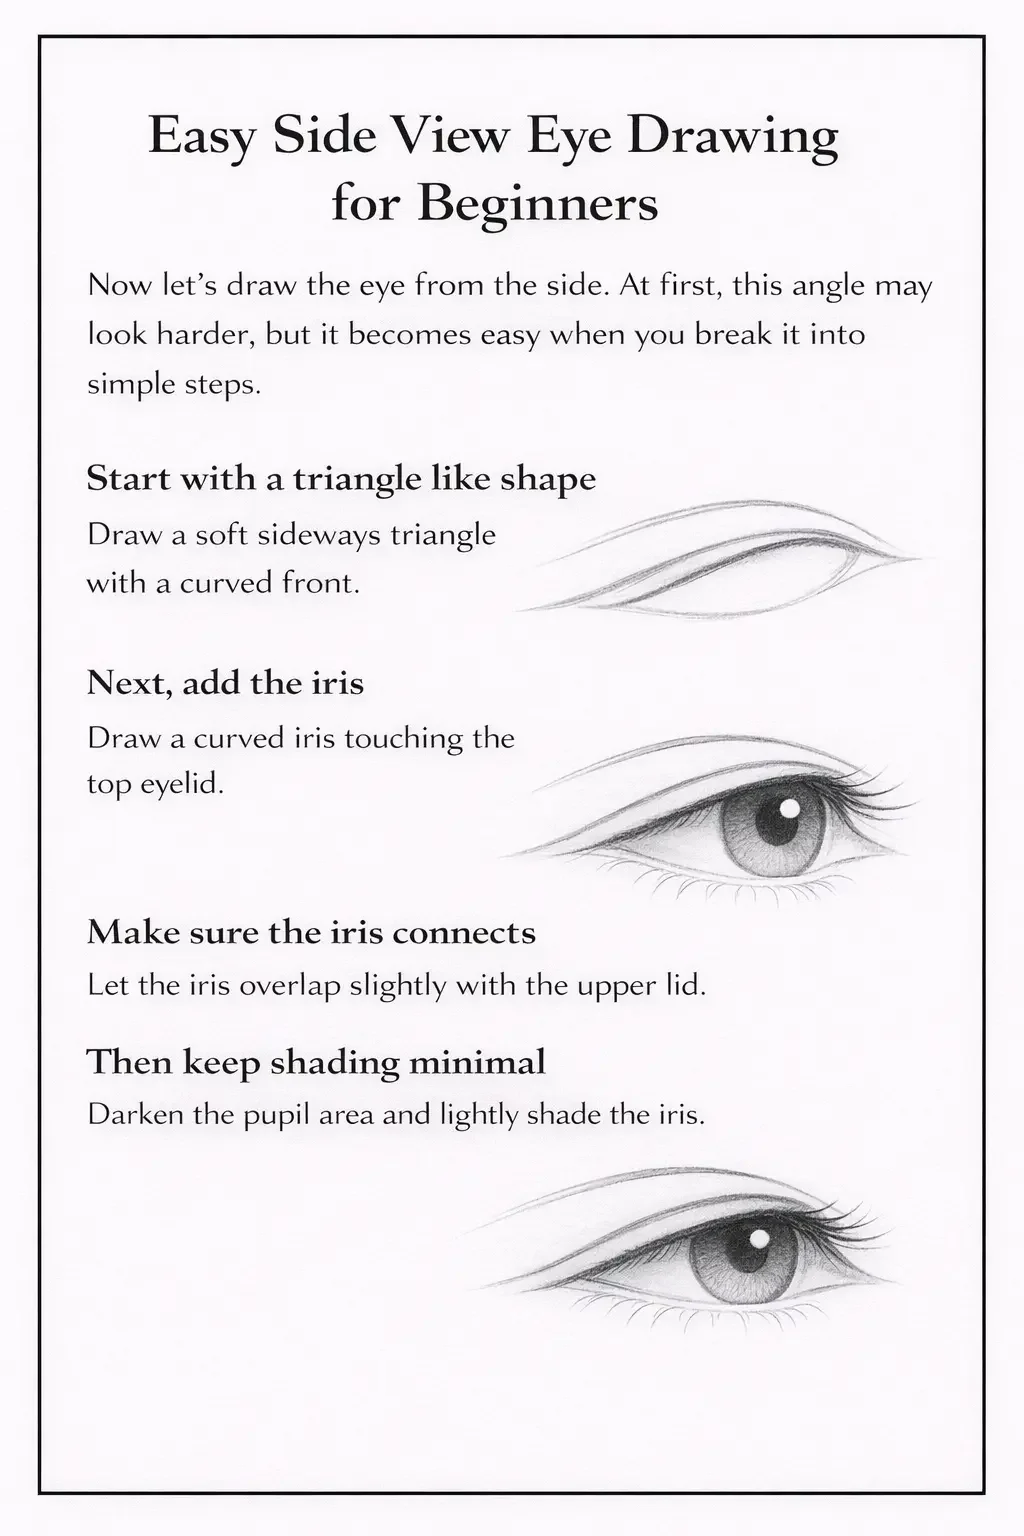
Now let’s draw the eye from the side. At first, this angle may look harder, but it becomes simple when you break it into small steps.
Start with a triangle-like shape. Instead of an almond shape, draw a soft sideways triangle with a curved front. This will form the outline of the eyelids from the side view. Keep your lines light so you can adjust the shape if needed.
Next, add the iris. From the side, the iris will not look like a full circle. Draw a curved shape that touches the top eyelid.
Make sure the iris connects slightly with the upper lid, because this helps the eye look natural and not surprised.
Then keep shading minimal. Darken the pupil area and lightly shade the iris. Add a soft shadow under the upper lid. Do not overwork the shading. From the side, simple values look better than heavy detail.
Conclusion
Now you know how to build an eye from the front and from the side. First, draw a simple shape. Then place the iris and pupil correctly. After that, add light shading and a few natural eyelashes. When you follow these small steps, learning how to draw eyes step by step feels easier and more structured.
Practice one eye each day. Focus on clean shapes before adding detail. With consistent practice, your control will improve, and your drawings will look more balanced.
More blog posts:


FAQs About How to Draw Eyes
Is drawing eyes hard for beginners?
No. Eyes look complex, but when you break them into simple shapes, the process becomes manageable. Start with structure before adding detail.
How long should I practice each day?
Practice for 15 to 20 minutes daily. Short and focused sessions help you improve faster than long irregular practice.
Why does my eye look flat?
Your eye may look flat if you skip shading or forget the shadow under the upper lid. Add soft contrast between light and dark areas to create depth.
What pencil is best for beginners?
An HB pencil works well for sketching. You can also use a 2B pencil to darken the pupil and shadows once the structure looks correct.