How to Draw Tears in The Eyes? Step By Step Tutorial
If you want your drawings to feel more emotional, you need to learn how to draw tears the right way. Even a small tear can change the whole mood of a face. It can show sadness, relief, pain, or even joy.
But many beginners draw tears as simple white lines. As a result, the face looks flat and fake. When you understand how tears really look and move on the skin, your art starts to feel more real.
So in this article, I will show you how to draw tears step by step in a simple way. First, you will learn the basic shapes. Then, you will learn how to add highlights and shadows.
After that, you will see how to draw realistic tears and also how to draw anime tears. By the end, you will know how to make tears look transparent, shiny, and natural in your drawings.
Why Drawing Tears Correctly Matters
Tears are not random lines under the eyes. They are transparent liquid forms that react to gravity, light, and facial structure. If you draw them without understanding how they behave, they will look fake and unrealistic.
When you draw tears correctly, you improve three major areas of your art:
Emotional impact:
Tears strengthen the emotional message of your drawing. For example, a character with slightly glossy eyes comes across as subtle and vulnerable. A character with heavy tear streams feels intense and dramatic.
Realism:
Even stylized art benefits from believable details. Correct highlights and shading create depth and dimension.
Storytelling:
A single tear can suggest a backstory. It can show heartbreak, reunion, pain, or happiness. Small details influence how viewers interpret your art.
If you draw tears as thick white lines or random shapes, the emotion will look forced. Understanding structure and light will strengthen your work.
Related blog post: How to Paint Clouds? Step-by-step Tutorial.
Tools You Need to Draw Tears
You do not need expensive materials or supplies. You need control and precision.
For Traditional Drawing, you can start with the following:
2B or 4B pencil for shading.
Kneaded eraser for lifting highlights.
Blending stump or tissue for smooth transitions.
Smooth paper for clean detail.
The kneaded eraser is important. You will use it to pull graphite off the page to create bright highlights. Without highlights, tears will not look wet.
If you want more control, use mechanical pencils for fine lines when drawing thin tear streams.
For Digital Drawing, prepare:
Soft and round brush.
Low opacity brush for shading.
Separate layer for highlights.
Keep your tear on a different layer from the skin. This allows you to adjust opacity and blending later. You can experiment with blending modes like Overlay or Screen to enhance shine.
No matter which method you use, focus on smooth transitions and clean highlights.
Understanding the Shape of Tears
Before you draw tears, observe real references. Notice how tears form, collect, and fall.
Tears on the Lower Eyelid
Tears first gather along the lower lash line. This area forms a thin and curved band of moisture. It follows the contour of the eye.
This thin layer reflects light strongly. It often appears as a subtle glossy line. If someone is about to cry, you will see shine before tears fall.
When drawing this stage, keep the line thin and controlled. Add small highlights to suggest moisture.
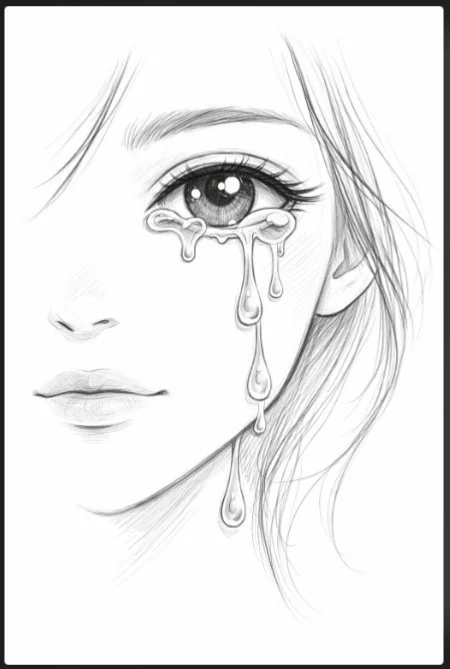
Tears Falling Down the Cheek

Once tears overflow, gravity pulls them downward. They rarely move in perfect straight lines. The shape shifts slightly based on the contours of the cheek.
Here are some important details to observe:
Some parts of the stream are thicker.
Some sections are narrow.
Edges are soft, not sharp.
The tear slightly magnifies the skin texture underneath.
Do not draw perfect or uniform lines. Add a slight variation to make them believable.
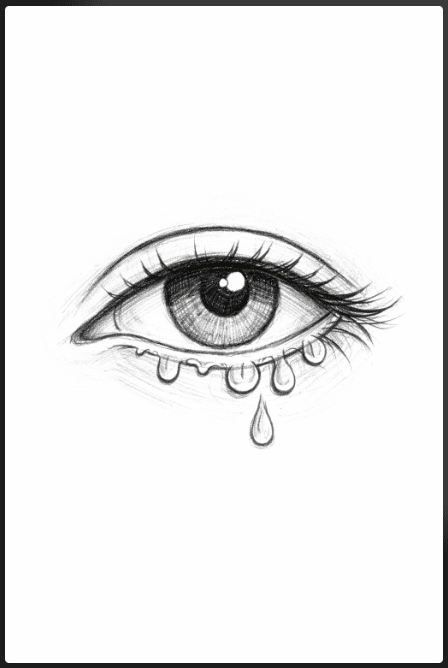
Single Tear Drop
A single teardrop often forms at the end of a stream. The shape resembles a rounded droplet. The bottom is heavier and fuller due to gravity.
Add a strong highlight near the top curve. You can add a subtle shadow beneath the droplet to show thickness.
Large Anime Style Tears
Anime tears exaggerate everything. They are larger, rounder, and more reflective.
Streams are thicker and often simplified. Highlights are bold white shapes. Realistic transparency is less important than clarity and drama. So understanding both realistic and stylized versions helps you adapt to different art styles.
Related blog post: 11 Easy Painting Ideas on Canvas for Beginners.
How to Draw Tears in Eyes Step by Step
To draw tears, you need to follow this process carefully. Each step builds on the previous one.
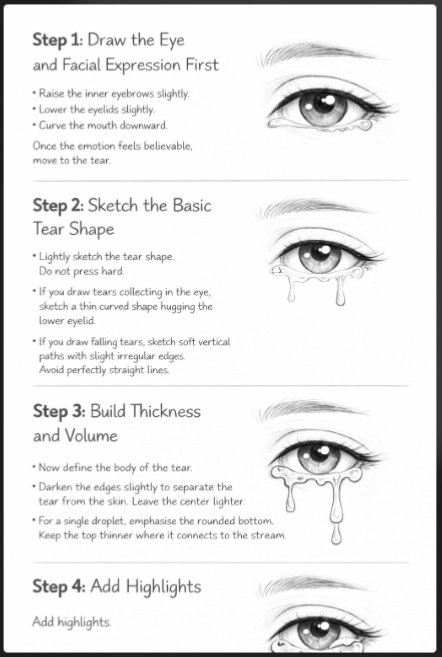
Step 1: Draw the Eye and Facial Expression First
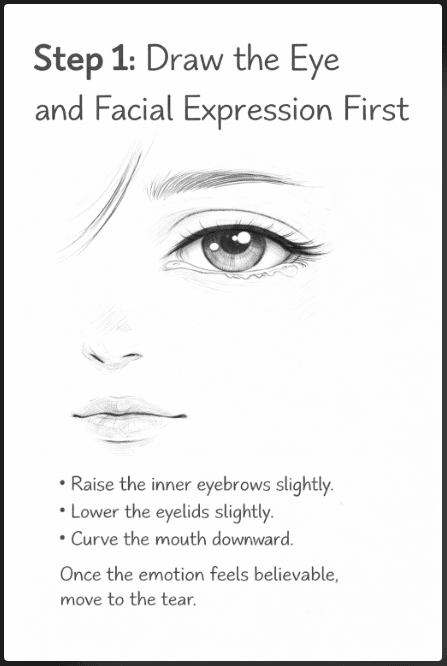
Never start with the tear. The emotion must come from the face.
Draw the eye shape, iris, and eyelids first. Then adjust the eyebrows and mouth to show emotion.
For sadness:
Raise the inner eyebrows slightly.
Lower the eyelids slightly.
Curve the mouth downward.
Once the emotion feels believable, move to the tear.
Step 2: Sketch the Basic Tear Shape

Lightly sketch the tear shape. Do not press hard.
If you draw tears collecting in the eye, sketch a thin curved shape hugging the lower eyelid.
If you draw falling tears, sketch soft vertical paths with slight irregular edges. Avoid perfectly straight lines.
Keep your strokes light so you can adjust them easily.
Step 3: Build Thickness and Volume
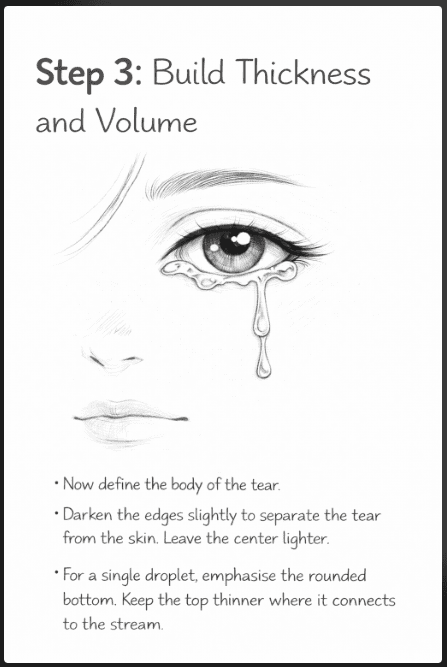
Now define the body of the tear.
Darken the edges slightly to separate the tear from the skin. Leave the center lighter.
Add slight bulges where the tear gathers more water. This creates depth.
For a single droplet, emphasize the rounded bottom. Keep the top thinner where it connects to the stream.
This step transforms a flat line into a three-dimensional object.
Step 4: Add Highlights
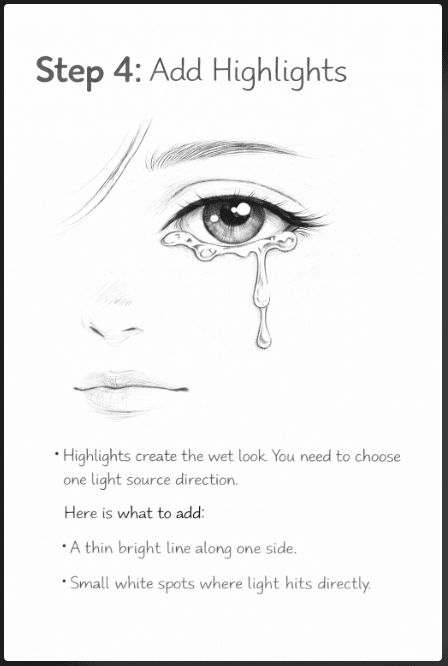
Highlights create the wet look. You need to choose one light source direction.
If light comes from the top left, place highlights on the top left edges of the tear.
Here is what to add:
A thin bright line along one side.
Small white spots where light hits directly.
Use your eraser gently in traditional drawing. Use a small white brush in digital art. You need to keep highlights sharp and controlled.
Step 5: Shade Around and Beneath the Tear
This step creates realism. Add subtle shadow beneath thicker areas of the tear. This shows that the tear sits on top of the skin.
Darken the skin slightly where the tear overlaps. This creates the illusion of transparency. Make sure to blend gently and avoid harsh lines.
When done correctly, the tear should look like clear liquid resting on the skin.
How to Draw Realistic Tears
To draw realistic tears, focus on physical behavior. Here is what you need to keep in mind:
Transparency: Do not fill the tear with solid white or heavy gray. Instead, lightly shade inside it. Let the original skin tone remain visible.
Refraction: Thicker tears bend light. Add slight tonal shifts inside the tear to simulate distortion.
Reflection: Water reflects light strongly. Add crisp highlights. The brighter and sharper the highlight, the wetter the tear appears.
Surface Interaction: A tear interacts with the skin. It creates tiny shadows. It may slightly change the texture beneath it.
Study close-up photos of tears. You have to notice how subtle these details are. Small adjustments create big improvements.
How to Draw Anime Tears
Anime tears focus on clarity and emotion. Start by exaggerating the size a little bit. You need to draw larger tear shapes under the eyes.
Make streams thicker and easier to see. Then add bold white highlights. Often these highlights are oval or circular.
After that, keep shading simple. Do not overblend. In dramatic scenes, tears may spray outward or pool heavily at the chin. You can exaggerate movement to enhance intensity.
Consistency matters. If you choose a stylized approach, apply it throughout the drawing.
Common Mistakes When Drawing Tears
Many artists struggle with similar problems. Here are some mistakes you need to avoid:
Drawing tears as flat white shapes: This removes depth and makes them look painted on.
Ignoring the light source: Highlights must follow one direction.
Making tears too symmetrical: Real tears vary in width and flow.
Over-shading: Heavy shading destroys transparency.
Forgetting skin interaction: Tears do not float. They sit on the skin.
Review your work after finishing. You need to compare it with reference photos and adjust.
Frequently Asked Questions
Here are some FAQs that might be useful:
How do you make tears look shiny?
To make tears look shiny, focus on highlights. Add small, bright reflections where the light hits the tear. At the same time, keep the edges soft. The contrast between soft edges and sharp highlights makes the tear look wet.
How do you draw a single teardrop?
Start by sketching a rounded drop shape. Make the bottom slightly wider since gravity pulls the water down. Then add a bright highlight near the top curve. After that, place a soft shadow underneath the drop so it looks like it sits on the skin.
How do you draw crying eyes easily?
First, work on the expression. Adjust the eyebrows and eyelids to show emotion. Once the face looks natural, add thin tear lines along the lower eyelid or down the cheek. The emotion should come from the face first, not the tears.
How do you shade transparent water drops?
Shade lightly inside the drop. Keep the center a bit lighter so it looks clear. Then add a small shadow below the drop to show thickness. This simple contrast makes the water look transparent.
Final Tips for Drawing Better Tears
Study real photo references often so you understand how tears flow and reflect light. Decide where your light source comes from before you add highlights. Keep your shading soft and controlled.
Avoid drawing perfectly straight tear lines because real tears are uneven. Also, practice drawing water drops on their own before adding them to a face.
When you learn how to draw tears step by step and practice regularly, your emotional drawings will look stronger and more believable. Over time, your tears will start to look natural without much effort.
More blog posts: