
How to Paint Clouds? Step-by-Step Acrylic Method
If you want to learn how to paint clouds, you are in the right place. Many beginners struggle to paint clouds. Their clouds often look flat, stiff, or unrealistic.

You paint the sky blue. Then you add white shapes for the clouds. Instead of natural-looking clouds, you get hard edges and flat areas. The sky ends up looking empty.
The good news is: you can fix this with a simple method.
In this article, I will show you how to paint clouds step by step using acrylic. You will learn how to shape your clouds, place shadows, and blend edges so they look natural.
By the end, you will know how to paint clouds with clear light, soft blending, and strong depth using a simple 5-step method. So let’s get started.
Why Clouds Matter in a Painting
Before we start the tutorial, I want to talk about why clouds matter in painting. Well, Clouds matter because they change the mood of your sky. They can make a scene feel calm and bright.
Clouds also add depth. They sit at different levels in the sky. When you place light highlights on top and darker shadows underneath, the clouds look three-dimensional. Without light and shadow, they look flat.
The shape of the clouds affects the feeling of your painting. Big fluffy clouds create a calm summer mood. Thin wispy clouds suggest wind and movement. Flat layered clouds can make the scene feel quiet or dramatic.
For example, I once painted a landscape with only a blue sky. The scene looked empty. I added three large cloud shapes. Then I painted soft shadows under them. The painting felt deeper and more balanced.
Related blog post: 11 Easy Painting Ideas on Canvas.
What You Need Before You Start
Before you start painting clouds, you will need these things:
Paint
You do not need many colors to paint clouds. Keep your palette simple. This helps you control light and shadow without making the sky look muddy.
Start with three main colors for the sky and clouds. Then add a small amount of gray for depth.
You will need:
White paint.
Light blue.
Dark blue.
A small amount of gray.
To create shadows, mix a little black into white to make a soft gray. Use a small amount of black so the color stays natural.
Example setup:
On a 30 by 40 cm canvas, place three small paint blobs on your palette. Put dark blue at the top, light blue in the middle, and white on the side for clouds and highlights. This setup keeps your workflow simple and organized.
Brushes
You only need a few basic brushes. Choose brushes that help you blend and soften edges.
You can use:
A round brush to dab cloud shapes.
A flat brush to blend the sky.
A clean and dry brush to soften edges.
If you only have two brushes, keep it simple. Use a flat brush to blend the sky. Use a soft brush to shape and blend the clouds.
How to Paint Clouds in 5 Easy Steps
Learning how to paint clouds is easier when you follow clear steps. These five simple steps will guide you from painting the sky to adding light and shadow.
If you prefer to see the process in action, watch the full YouTube video tutorial below. In the video, you will see exactly how to paint clouds.

How to paint clouds? Easy Tutorial.
Here are the steps to follow:
Step 1: Paint the Sky

In this step, you create the base for your clouds. You need to start with the background. Paint the sky before you add any clouds.
After that, use dark blue at the top of the canvas. Use light blue near the bottom. Blend the two colors where they meet.
Use horizontal strokes with a flat brush. Work while the paint is still wet. Then lightly blend the middle area so the transition looks smooth.
Make sure to let the sky dry slightly before moving to the next step.
Step 2: Add Basic Cloud Shapes

In this second step, you block in the main cloud forms. Switch to white paint. Then load a small amount on your brush.
Make sure you dab gently to form cloud shapes. Keep the shapes uneven. Avoid perfect circles.
Place your clouds with intention. Paint one large cloud in the center. Then add two smaller ones around it. This creates balance and avoids repetition.
Step 3: Add Shadows
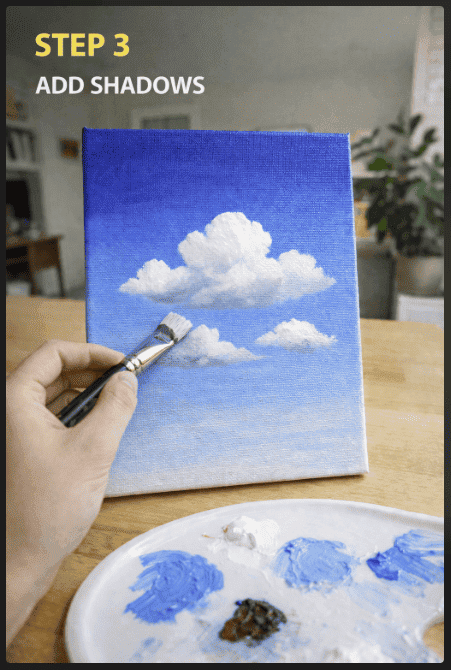
In the third step, you need to add depth and form. So mix a soft gray using white and a tiny bit of black.
After that, add this gray under the parts of each cloud. Do not cover the entire bottom edge.
Choose a clear light direction. If the sun comes from the right, place shadows on the left and bottom areas.
Related posts:


Step 4: Blend the Edges
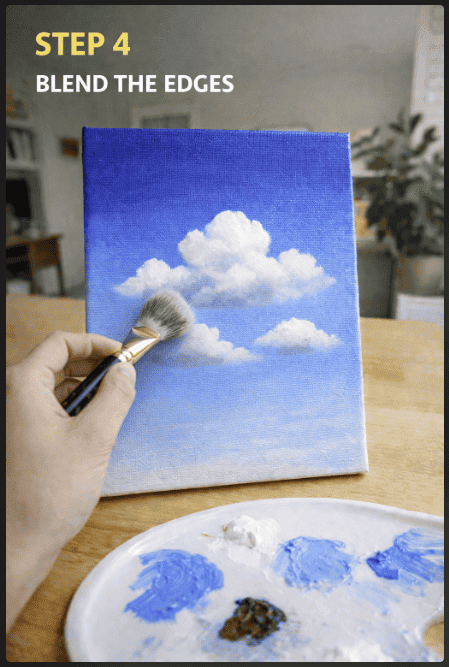
The next step is to soften the clouds. So use a clean and dry brush. Then gently soften where the gray meets the white.
Make sure you blend with small circular motions. Use light pressure.
Keep the top edges a little sharper. You can soften the lower edges more. Do not overblend. Keep contrast between light and shadow.
Step 5: Add Highlights
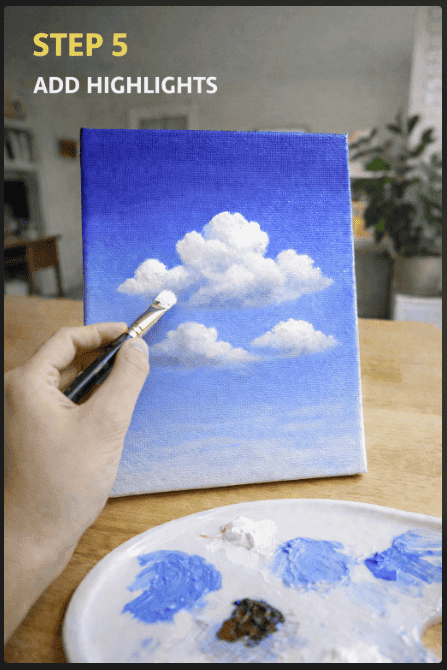
In this step, you bring the clouds to life. So use small touches of pure white. Then place them on the top edges where the light hits. Keep the strokes light and controlled.
Do not cover the whole cloud with white. Highlights stand out because they sit next to the shadow.
Related blog post: 15 Whale Shark Drawing Ideas.
Common Mistakes to Avoid
Here are some common mistakes you need to avoid when painting clouds:
Using Only Pure White
If you paint clouds with only pure white, they will look flat and cut out. Real clouds have form because light hits some areas and leaves others in shadow.
When you apply only white, you remove contrast. Without contrast, there is no depth.
Instead, build three values:
Bright white for highlights.
Soft white or light gray for mid areas.
Medium gray for shadow.
Keep the brightest white only on the top edges facing the light. Add subtle gray underneath. Even a small shift in value makes a big difference.
If your clouds look like cotton glued onto the sky, add shadow first before adding more white.
Making All Clouds the Same Size
When every cloud is the same size and shape, your sky looks artificial.
Nature rarely repeats evenly. Some clouds dominate the sky. Others sit in the distance. Variation creates realism and depth.
Try this simple composition rule:
One large cloud is the focal point.
One medium cloud nearby.
One or two smaller clouds spaced unevenly.
Also vary spacing. Leave more open sky in some areas and cluster clouds in others. This creates movement and keeps the viewer’s eye engaged.
If your sky feels boring, change scale and spacing before changing color.
Forgetting the Light Source
Light direction controls everything. Before you paint shadows, decide where your sun is located.
Top right. Top left. Behind the cloud. Choose one and stay consistent.
Shadows must sit opposite the light. If light comes from the right, shadows sit on the left and bottom.
Inconsistent shading confuses the viewer. Even if they do not know why the painting feels wrong, they will sense it.
Simple tip: Light first. Shadow second. Highlight last.
Overblending
Blending helps create softness, but too much blending removes structure.
If you soften every edge, the cloud loses definition. Strong clouds need a mix of soft and firm edges.
You need to keep:
Softer edges on the bottom.
Slightly sharper edges on the top where light hits.
Blend gently. Use light circular motions. Stop early. Step back and look from a distance.
If your clouds look blurry or muddy, you likely blended too long.
Tips for Better Clouds
Look at Real Sky Photos
Observation improves your results faster than guessing.
Look at the sky at different times of day. Morning clouds often appear softer and lighter. Midday clouds show a stronger contrast between highlight and shadow.
Pay attention to:
How is the top brighter than the bottom?
How do some areas fade into the sky?
How do clouds overlap each other?
Spend five minutes observing before painting. It trains your eye.
Paint in Layers
Do not try to finish the cloud in one pass. Start with basic shapes. Let the paint settle. Then add shadows. After that, add highlights.
Layering keeps colors clean and prevents muddy mixing. It also gives you more control over contrast.
If you rush and blend everything at once, the result looks dull.
Keep Shapes Uneven
Clouds are irregular. Avoid perfect circles. Don’t repeat patterns. Avoid symmetry.
So use broken edges and uneven dabs. Make one side fuller than the other. Add small bumps and soft dips.
Irregular shapes look natural. Perfect shapes look designed.
Practice Often
Cloud painting improves through repetition. You need to try quick 10-minute studies. Paint only one cloud on a small canvas. Focus on light direction and shadow placement.
Personal routine example: I once painted five small cloud studies in one afternoon. The first looked flat. By the third, my shadows improved. By the fifth, my highlights felt intentional and controlled.
Short practice sessions build skill faster than one large painting done occasionally. If you want better clouds, paint more skies.
Conclusion
As you can see, now you know how to paint clouds using a simple acrylic method. You can start with a smooth sky gradient, build soft shapes with dabbing strokes, then add gray shadows and bright highlights for depth.
When you follow this how-to-paint-clouds acrylic approach, your skies look more realistic and less flat. Practice the steps, control your contrast, and your cloud paintings will improve with each canvas.
More blog posts:


Frequently Asked Questions
Here are some FAQs:
What Color Are Clouds?
Clouds look white because sunlight reflects off the top layers. In contrast, the lower areas look gray since the shadow blocks the light. When you add soft gray tones to the bottom sections, you create depth and make the cloud look three-dimensional.
How Do You Make Clouds Look Soft?
First, use gentle dabbing motions to build the main shape. Then, blend the edges with a slightly damp brush using small circular movements. As a result, you remove hard lines and give the cloud a soft, airy look.
Why Do My Clouds Look Flat?
Clouds look flat when you skip contrast between light and shadow. To fix this, place medium gray underneath the cloud to define the shadow. After that, add small touches of pure white on top where light hits. This contrast adds volume and restores depth.