
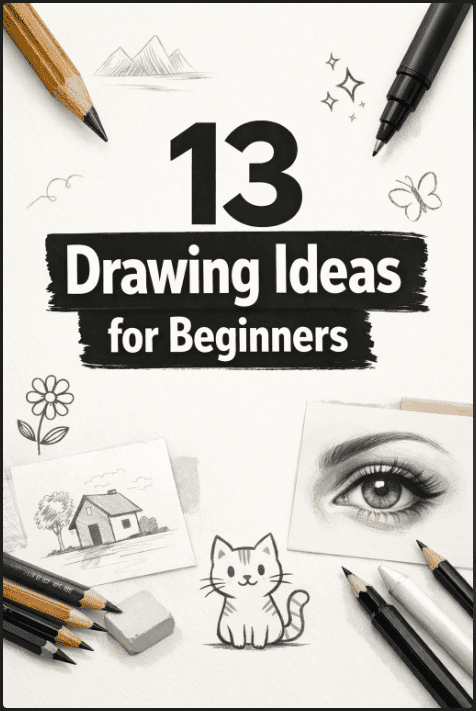
13 Drawing Ideas for Beginners That Build Skills
If you are searching for drawing ideas for beginners, you are likely feeling stuck, unsure what to draw, or frustrated with results that do not match what you see in your head.
The truth is simple. Improvement does not come from random sketches. It comes from structured practice built around the right subjects.
Most beginners quit because they choose drawings that are too complex too early. Faces without guidelines. Animals without structure. Landscapes without understanding light.
When you focus on the right exercises, your progress becomes predictable. Your lines get cleaner. Your shading becomes smoother. Your proportions start to look accurate.
In this article, you will discover a list of drawing ideas for beginners designed to build real foundational skills.
Each one trains a specific ability such as observation, perspective, value control, or construction. So let’s get right into it.
Note: Some links in this article are affiliate links.
13 Drawing Ideas for Beginners
The following drawing ideas for beginners focus on building strong fundamentals like proportion, shading, and structure.
Each idea helps you practice specific skills, so you improve with every drawing session.
1. Single Object Still Life Drawing
A single object still life is one of the most powerful drawing ideas for beginners because it forces you to slow down and observe.
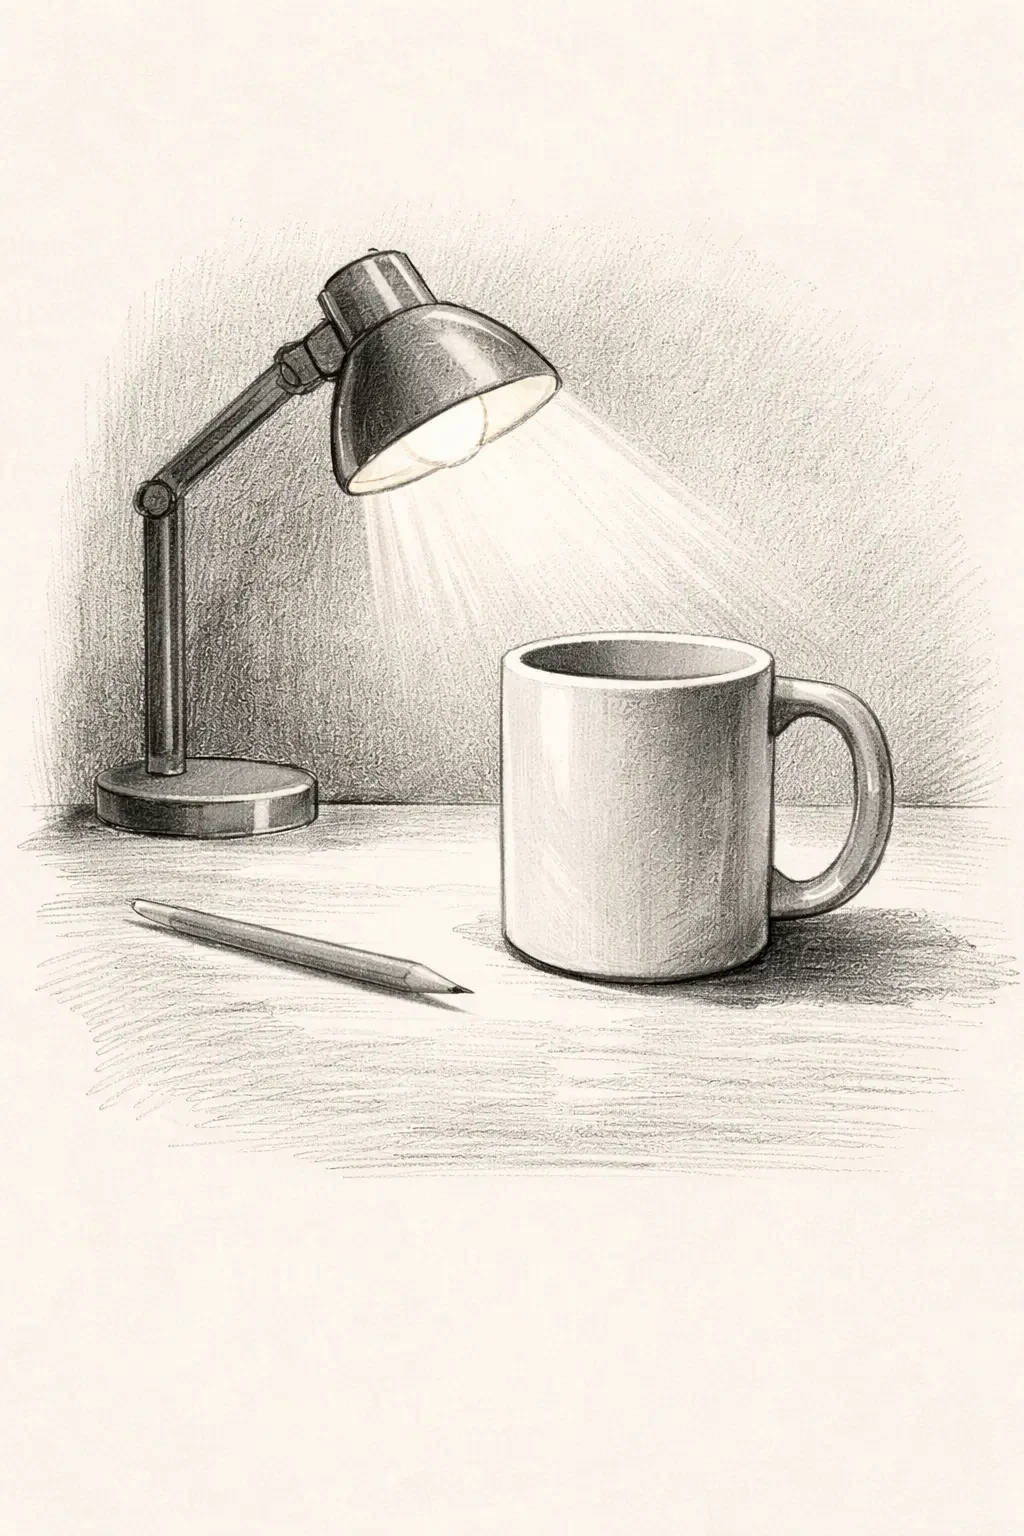
Choose a simple object such as a mug, apple, bottle, or phone. Place it under one light source so shadows are clear. Avoid complex patterns in the beginning. The goal is to understand light, not decoration.
Start by lightly sketching the outer contour. Do not press hard. Measure height versus width using your pencil as a visual guide.
Once proportions look accurate, identify the darkest shadow area. Build shadows gradually from dark to light. Keep highlights clean and avoid outlining everything with heavy lines.
Related blog post: 11 Easy Painting Ideas on Canvas for Beginners.
Focus on these steps:
Sketch the overall shape before adding details.
Identify one consistent light source.
Separate light areas from shadow areas.
Build values slowly instead of rushing.
This exercise improves:
Observation accuracy.
Value control.
Edge sensitivity.
If you repeat this exercise with five different objects, your shading will improve noticeably within two weeks.
2. Basic 3D Shapes With Realistic Shading
Before drawing complex subjects, you must understand form. Every object in the real world breaks down into spheres, cubes, and cylinders. Mastering these shapes gives you control over light and volume.
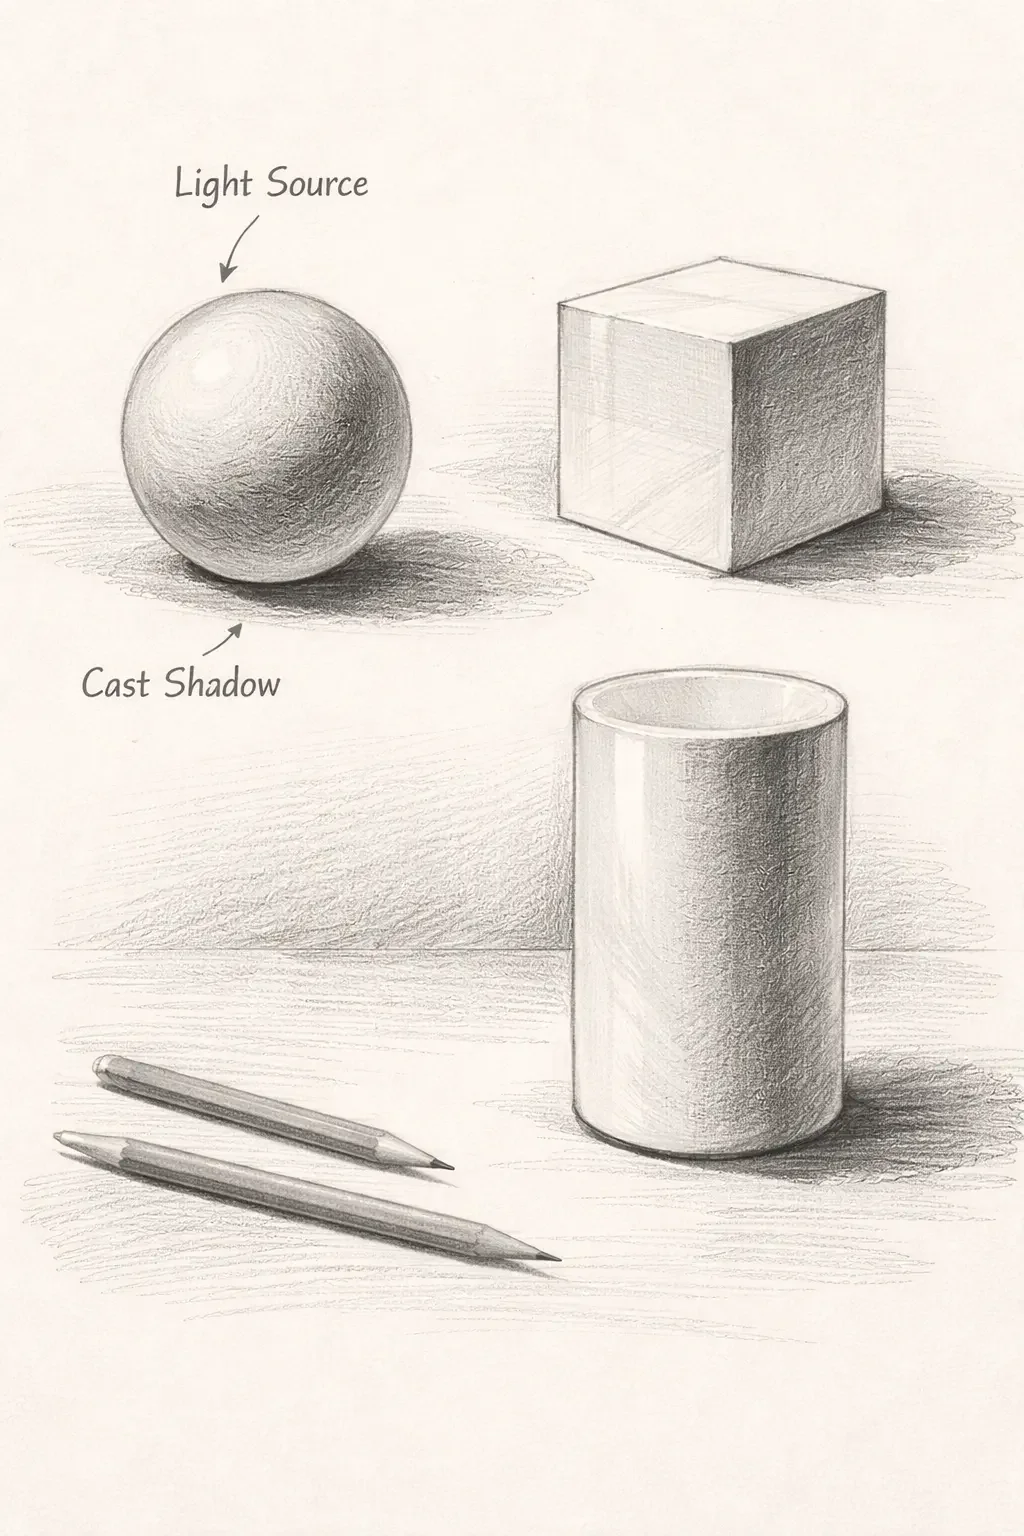
Draw a sphere and choose a single light direction. Add a highlight, mid tone, core shadow, and cast shadow. Then draw a cube in perspective. Shade each plane differently based on light direction. Finally, draw a cylinder and practice smooth shading transitions.
Follow this method:
Draw lightly constructed shapes.
Pick one clear light direction.
Add a core shadow opposite the light.
Add a cast shadow on the ground.
This practice strengthens:
3D thinking.
Light logic.
Spatial awareness.
When you later draw faces, animals, or landscapes, your forms will look solid instead of flat.
3. Drawing Your Hand From Observation
Hands challenge beginners because they include proportion, anatomy, and foreshortening. That is why they are one of the best drawing ideas for beginners who want great improvement.
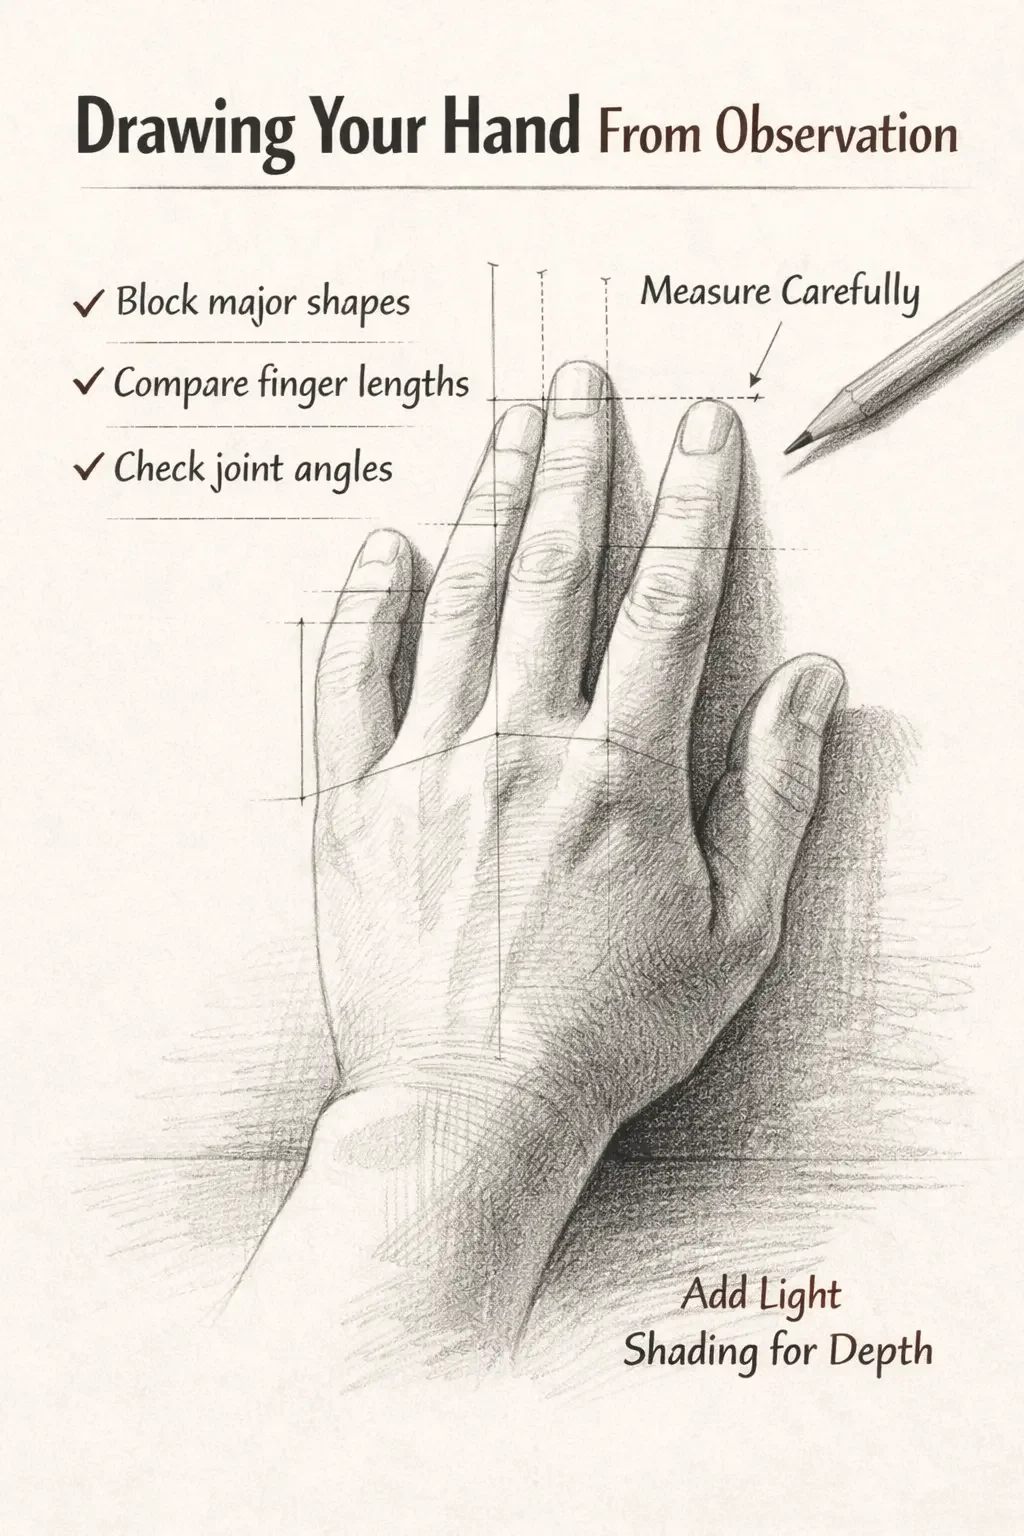
Place your hand on a table in a relaxed position. Start by blocking the palm as a simple shape. Mark the length of each finger before drawing details. Compare widths carefully. Many beginners draw fingers too long or too thin.
Use this structure:
Block major shapes first.
Compare finger lengths before refining.
Check angles between joints.
Add light shading to show depth.
This exercise builds:
Measurement skills.
Anatomical awareness.
Patience.
Draw your hand from three different angles during the week. You will notice improvement in proportion control quickly.
4. Simple Portrait Using Construction Lines
Portraits intimidate beginners, but structure solves most problems. A well-constructed face looks accurate even without heavy detail.
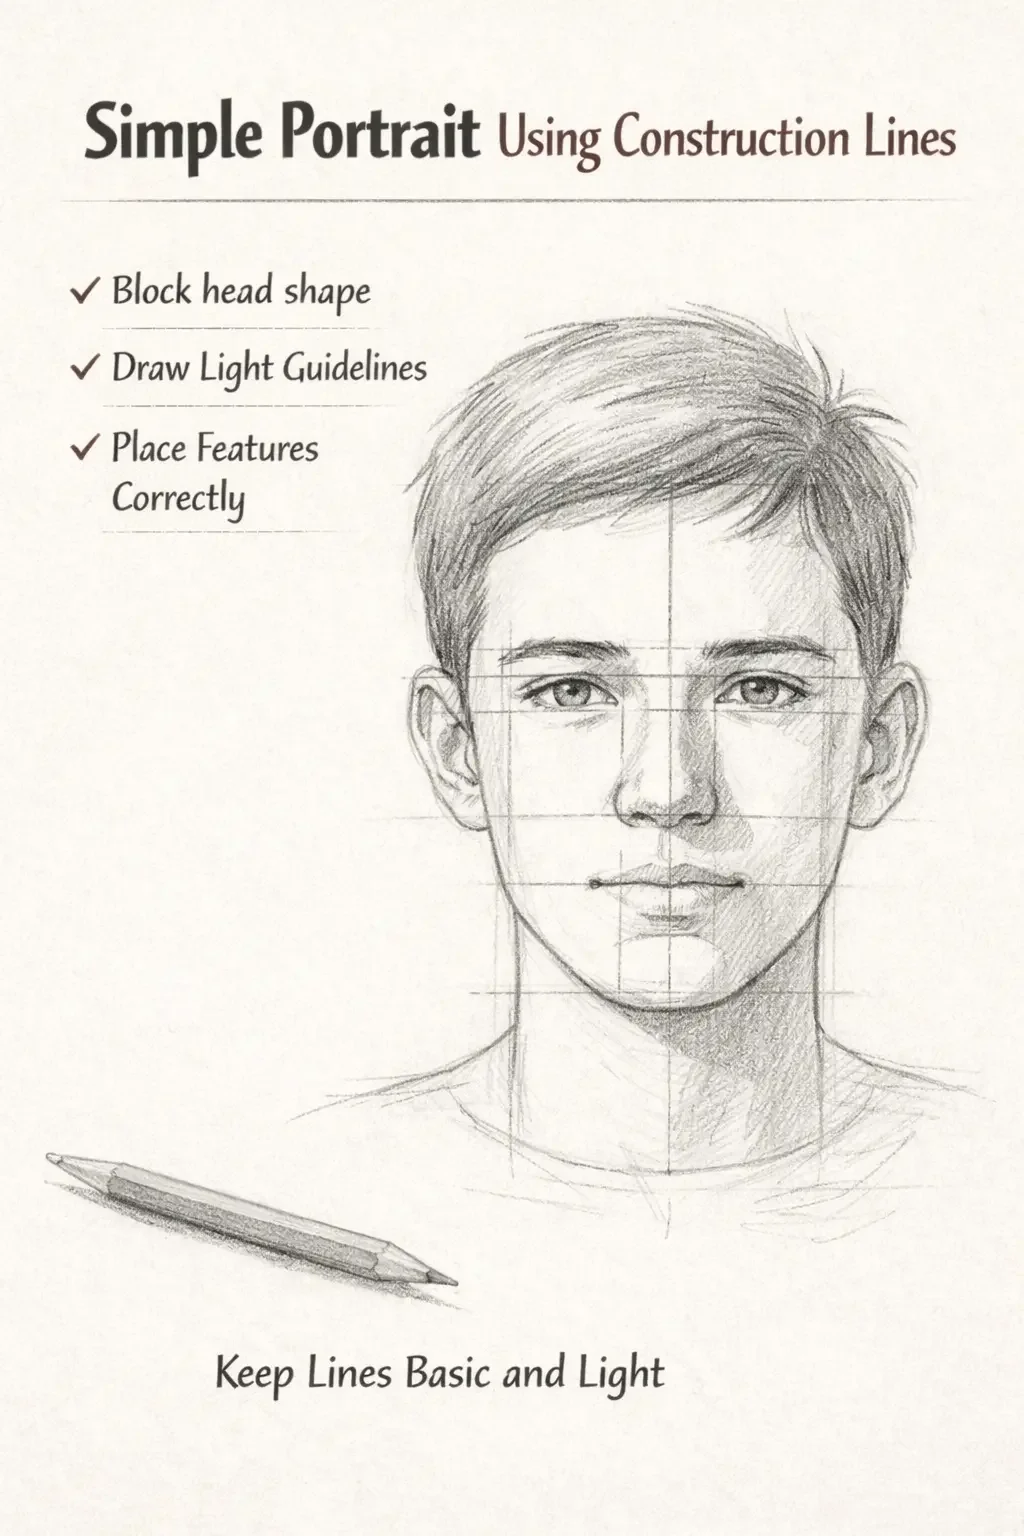
Start with a circle for the skull. Add a jawline. Draw an eye line halfway down the head. Divide the lower half to position the nose and mouth. These proportional guidelines prevent misplaced features.
Focus on this process:
• Draw the head structure first.
• Place guidelines before features.
• Compare spacing between eyes.
• Refine shapes gradually.
Portrait practice improves:
• Facial proportion.
• Symmetry.
• Structural thinking.
Avoid shading too early. Accuracy comes first.
5. Leaves and Plants for Organic Flow
Plants are ideal drawing ideas for beginners because they teach natural curves without strict symmetry. They allow you to practice organic rhythm and layered shading.

Begin with one leaf. Draw the central vein first. Build the outer shape around it. Observe how edges curve naturally instead of forming perfect lines. Add light shading underneath overlapping parts.
Practice with:
• Single leaves.
• Small branches.
• Simple potted plants.
You develop:
• Fluid line control.
• Texture awareness.
• Light layering.
Organic subjects improve confidence with curved forms.
6. Drawing Shoes to Understand Complex Forms
Shoes combine curves, structure, perspective, and small details. They train your eye to see volume clearly.
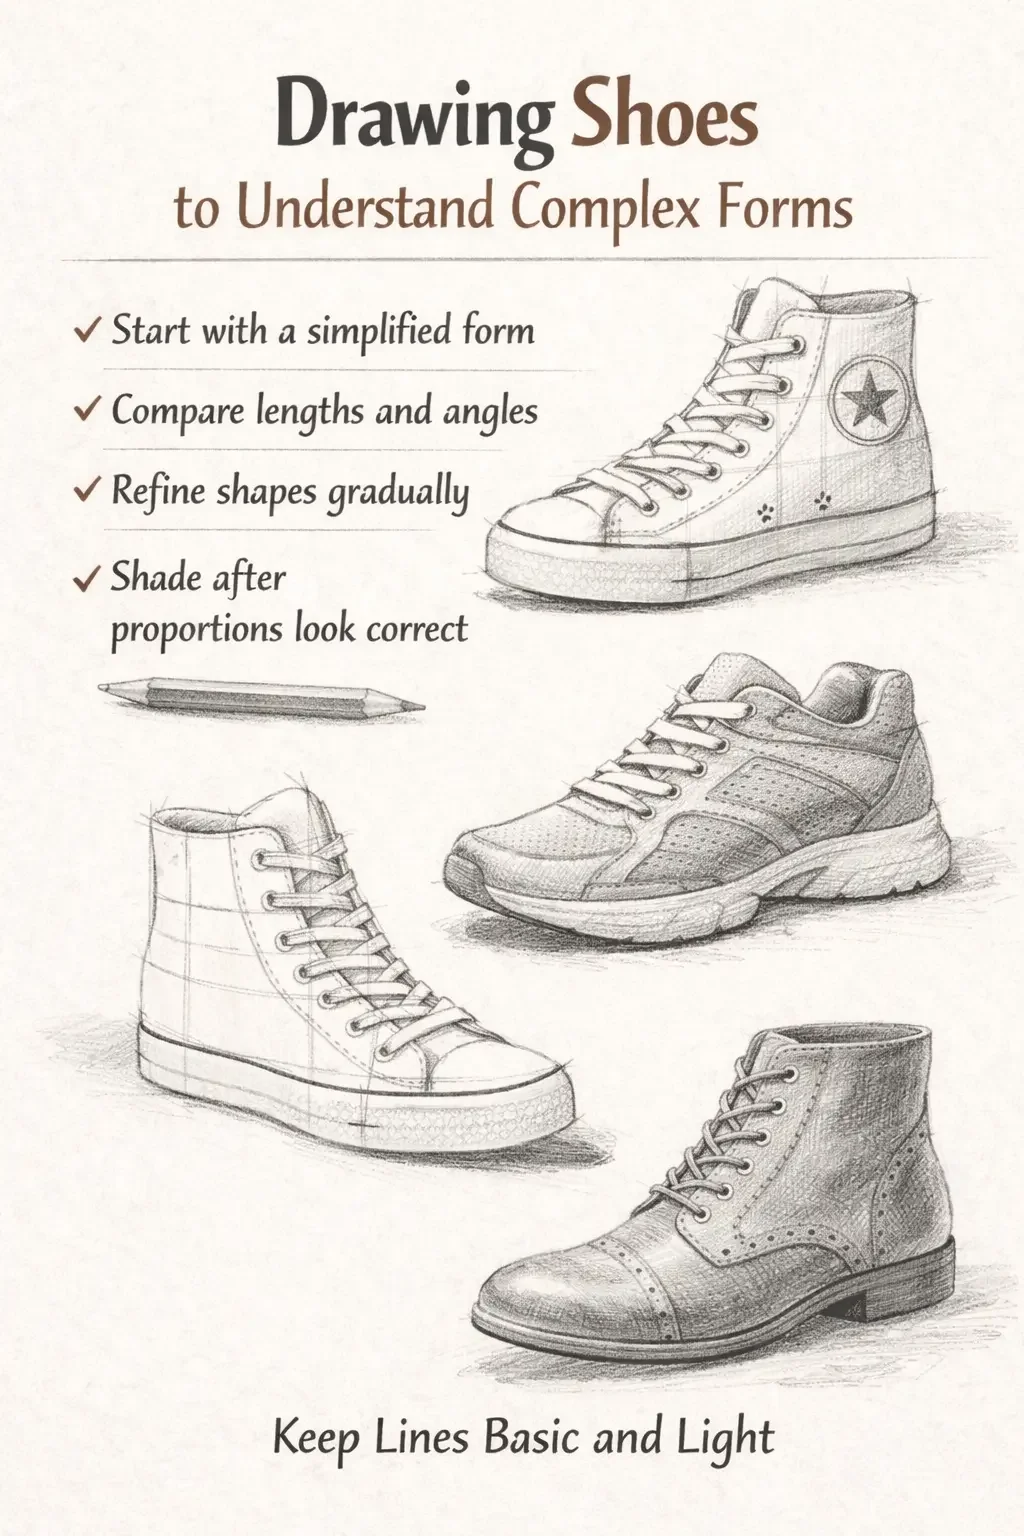
Place a shoe at eye level. Sketch the silhouette first. Identify the main planes before drawing laces or stitching. Check angles carefully.
Focus on:
• Overall shape before detail.
• Identifying planes.
• Gradual shading for depth.
• Checking proportions early.
You build:
• Structural accuracy.
• Depth perception.
• Detail control.
Shoes are challenging but effective for rapid improvement.
Related posts:


7. Trees Using Value Masses Instead of Detail
Beginners often draw every leaf, which leads to messy results. Instead, think in value masses.

Block the entire tree shape first. Identify dark shadow clusters. Add light texture to suggest leaves instead of drawing them individually.
Use this approach:
• Simplify the silhouette.
• Group shadows together.
• Add texture sparingly.
• Keep distant trees lighter.
This improves:
• Simplification skills.
• Value grouping.
• Composition clarity.
Learning to simplify prevents overworking drawings.
8. Furniture for Perspective Practice
Furniture forces you to deal with straight lines and structure. Draw a chair or table from observation. Use light perspective guidelines.
Pay attention to:
• Parallel lines.
• Converging angles.
• Vertical alignment.
Practice by:
• Drawing from different viewpoints.
• Checking angles visually.
• Refining only after the structure looks correct.
You strengthen:
• Perspective understanding.
• Alignment control.
• Structural precision.
This skill transfers directly to architectural drawing.
9. Realistic Eye Study With Detailed Shading
A detailed eye study teaches precision and smooth shading transitions. Start with the almond shape. Add iris and pupil. Darken the outer ring of the iris. Keep highlights clean.
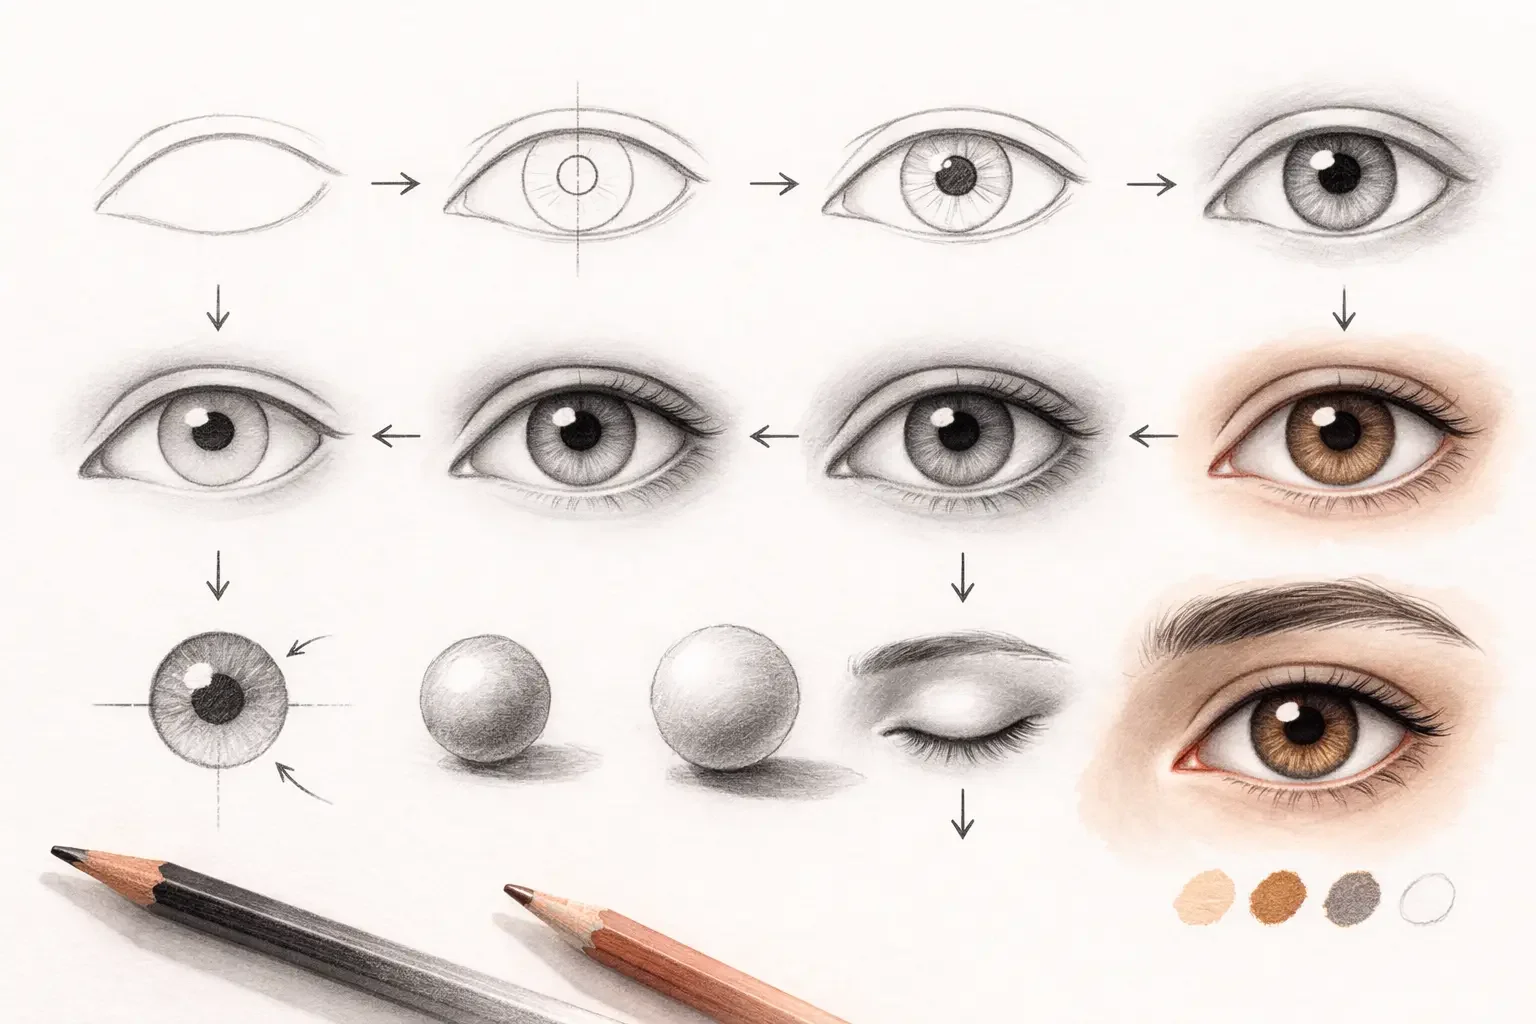
Follow these steps:
• Outline lightly.
• Shade sclera gently.
• Add core shadows under the eyelid.
• Blend smoothly.
You develop:
• Detail accuracy.
• Contrast control.
• Blending technique.
Avoid heavy outlines. Let shading create form. You can have a look at my previous blog post about: How to Draw Eyes Step by Step?
10. Simple Landscape With Depth
Landscapes teach spatial layering. Draw a horizon line first. Add a foreground object, midground element, and distant background.
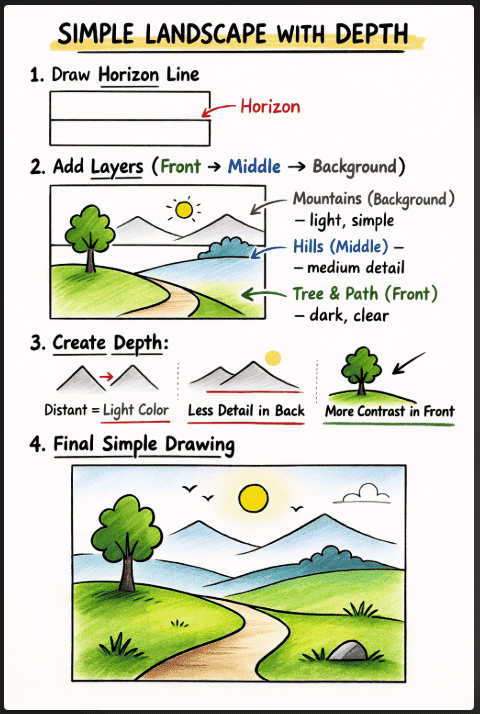
Create depth by:
• Making distant objects lighter.
• Reducing detail in the background.
• Increasing contrast in foreground.
This builds:
• Atmospheric perspective.
• Composition planning.
• Depth awareness.
Practice multiple small landscapes instead of one large drawing.
11. Animal Construction Using Basic Shapes
Animals become easier when you break them into simple geometry. For a cat, use an oval for the body and a circle for the head. Add cylinders for legs.
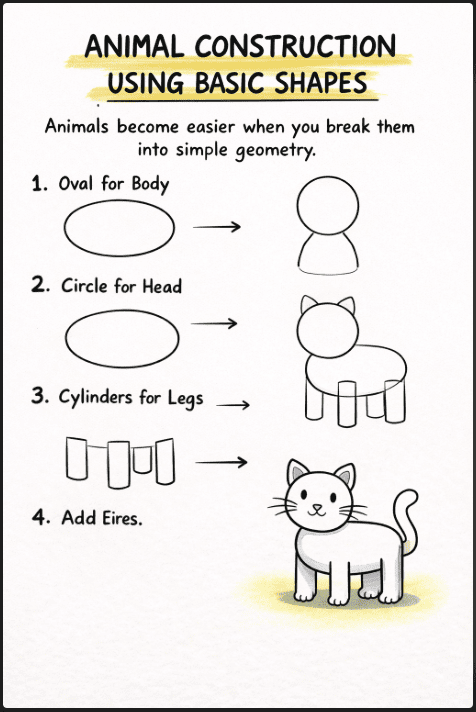
Focus on:
• Proportional balance.
• Gesture flow.
• Structural blocking.
Refine after the structure looks correct.
You improve:
• Construction thinking.
• Body proportion.
• Dynamic posture.
This approach works for dogs, birds, and other animals.
12. Everyday Scene Composition
Drawing a full scene challenges your ability to manage space. Choose a small section of your room. Block major shapes first.

Pay attention to:
• Relative object sizes.
• Spacing between items.
• Overlapping forms.
You develop:
• Composition balance.
• Scale accuracy.
• Spatial organization.
Scenes train your ability to simplify complex environments.
13. Self Portrait for Maximum Growth
A self-portrait is one of the most effective exercises for developing technical accuracy because it forces you to apply proportion, structure, and shading at the same time. When you draw your own face using a mirror, you cannot rely on memory.

You must observe, measure relationships between features, and adjust constantly. This level of focus accelerates improvement faster than copying stylized references.
Use a clear step-by-step approach:
Block the overall head shape before adding details.
Draw light construction guidelines for the eyes, nose, and mouth.
Compare distances between features instead of guessing.
Refine shapes gradually and shade only after proportions look correct.
This exercise strengthens:
Precision in measurement.
Careful observation.
Patience and discipline.
Repeat a self-portrait once every month. When you compare drawings over time, you will see clear progress in structure, accuracy, and value control.
Conclusion
These 13 drawing ideas for beginners focus on the fundamentals that matter most: proportion, shading, structure, and observation. If you practice them consistently, your skills will improve in a steady and measurable way.
Choose one idea at a time, repeat it often, and focus on accuracy before adding detail. With consistent practice, your drawings will look more balanced, more realistic, and more confident.
Thank you for reading this article. I hope it was useful.
More blog posts:


FAQs About Drawing Ideas for Beginners
Here are some frequently asked questions about drawing ideas:
What are the best drawing ideas for beginners?
The best drawing ideas for beginners are subjects that build core fundamentals. Focus on simple still life objects, basic 3D shapes, hands, eyes, trees, and everyday scenes. These exercises improve proportion, shading, and structure. Start simple and repeat the same subject several times to see faster improvement.
How often should beginners practice drawing?
Beginners should practice at least 20 to 30 minutes per day, five days per week. Short, consistent sessions improve muscle memory and observation skills faster than long sessions done occasionally. Consistency matters more than duration.
How long does it take to get better at drawing?
If you practice structured drawing ideas for beginners consistently, you can notice cleaner lines and better proportions within two to four weeks. Visible improvement depends on repetition, focused exercises, and honest self-correction.
Should beginners draw from imagination or reference?
Beginners should mostly draw from real life or photo reference. Drawing from observation builds accurate proportion and shading skills. Once your fundamentals improve, drawing from imagination becomes much easier and more realistic.
What tools do beginners need to start drawing?
You only need basic tools to start. Use an HB pencil, a 2B pencil, a simple eraser, and a sketchbook. Strong fundamentals matter more than expensive supplies. Focus on technique before upgrading materials.
Why do my drawings look flat?
Drawings look flat when you ignore light and shadow. To add depth, choose one light source and separate light areas from shadow areas clearly. Practice shading spheres, cubes, and cylinders to understand volume before moving to complex subjects.