
How to Draw a Face Step by Step for Beginners?
If you’re looking for step-by-step instructions on how to draw a face, you have come to the right place. Drawing a face presents a common challenge for beginners.

That’s because facial features require correct placement and proportion. Small mistakes in spacing or alignment change the entire look of the drawing.
A structured method solves this problem. You will learn to construct the face using basic shapes before adding details. This approach builds accuracy and control.
Experience from beginner drawing courses shows a clear pattern. Students learn faster when they follow a step-by-step construction method rather than drawing features at random.
Each feature must relate to the others. This guide explains a practical system used in many art classes. You will learn how to draw a face in six steps using simple guidelines and observation.
Here are a few simple tools to help you during practice:
• Pencil with light pressure control.
• Eraser for corrections.
• Plain drawing paper.
• Reference photo or mirror for observation.
How to Draw a Face Step By Step?
Drawing a face becomes easier when you follow a clear process. First, you build the basic structure. Then you place the facial features using simple guidelines.
Follow the steps below in order. Each step helps you place the eyes, nose, and mouth correctly. As a result, your drawing will look more balanced and natural.
Step 1: Draw the basic head shape
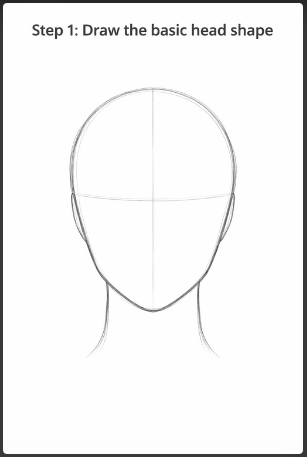
Start with the overall structure of the head. The human skull forms the base of the face. When beginners start with facial features first, proportions often become incorrect.
Artists begin with the skull shape because every feature aligns with this structure. A simple circle provides a starting point.
Draw a circle lightly on the page. This circle represents the upper portion of the skull. Human heads extend below the circle because the jaw and chin form the lower structure of the face.
Draw two angled lines downward from both sides of the circle. Connect these lines with a curved line to create the chin. The result looks similar to an egg shape.
This construction stage creates a stable base for the rest of the drawing. When the head shape appears balanced, facial features will align more easily. Keep all lines light. Artists often erase or adjust these lines during later steps.
Key tips during this stage:
• Use light sketch lines.
• Focus on overall head proportions.
• Avoid drawing facial features yet.
• Keep the chin centered under the circle.
Related blog post: How to Draw Lips Step by Step?
Step 2: Add facial guidelines
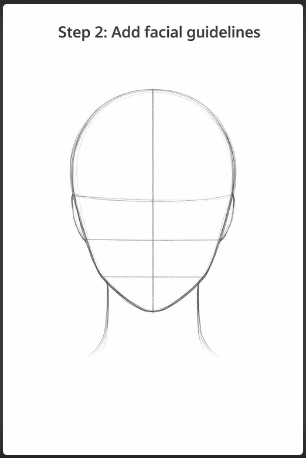
Guidelines act as a map for placing facial features. Without guidelines, beginners often place their eyes too high or too low. The human face follows predictable proportions. These proportions help artists create balanced drawings.
Draw a vertical line through the center of the head. This line divides the face into left and right halves. Symmetry improves accuracy. Next, draw a horizontal line across the center of the head.
This line marks the location of the eyes. Many beginners feel surprised when they learn that the eyes sit halfway down the head.
Related blog post: How to Draw Eyes Step by Step?
Add another horizontal line halfway between the eye line and the chin. This line marks the bottom of the nose. Add one more line halfway between the nose line and the chin. This line marks the position of the mouth.
These simple guides organize the entire face. Each feature sits within a clear position. Artists use these guidelines during almost every portrait sketch.
Important guideline rules:
• Eyes sit halfway between the top of the head and the chin.
• Nose sits halfway between eyes and chin.
• Mouth sits halfway between nose and chin.
• Vertical line helps maintain facial symmetry.
Step 3: Draw the eyes

The eyes often become the focal point of a portrait. Many artists start portraits with the eyes because they give personality to the face. During beginner practice, focus on correct placement before adding small details.
Draw two almond-shaped outlines along the eye guideline. Leave space between the eyes equal to the width of one eye.
This spacing appears in most human faces and helps create balanced proportions. When eyes appear too close together, the face looks unnatural.
Add circles inside each almond shape for the irises. Inside the iris, draw a smaller circle for the pupil. Draw a curved line above each eye to represent the eyelid. The upper eyelid usually appears thicker because eyelashes grow from this edge.
Keep lines simple during early practice. Avoid heavy shading. Focus on overall eye shape and placement.
Common eye drawing tips:
• Leave one eye width between both eyes.
• Align eyes along the center guideline.
• Draw eyelids before eyelashes.
• Keep shapes simple during early sketches.
Step 4: Draw the nose
The nose sits between the eyes and the mouth. Beginners often outline the nose heavily, which makes the drawing look unnatural. In reality, the nose appears through light and shadow rather than strong outlines.
Start by drawing two small circles for the nostrils along the nose guideline. These circles help position the base of the nose. Draw light lines upward from the nostrils toward the inner corners of the eyes. These lines represent the bridge of the nose.
Avoid drawing hard edges along the sides of the nose. Most noses blend smoothly into the surrounding face. Light shading later will create the nose shape more effectively than thick outlines.
Artists often simplify the nose into three main parts during early sketches:
• Nose bridge.
• Nose tip.
• Nostrils.
Helpful nose drawing tips:
• Use light lines for the bridge.
• Avoid strong outlines.
• Keep nostrils small and subtle.
• Focus on placement rather than detail.
Step 5: Draw the mouth and ears
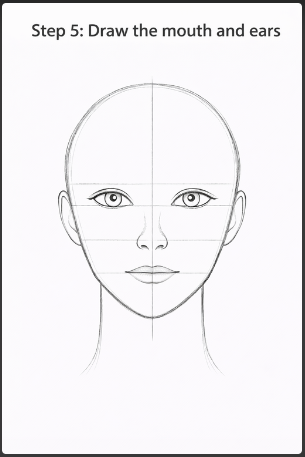
The mouth adds expression to the face. Accurate placement improves realism. Start by drawing a short horizontal line on the mouth guideline. This line represents the center where the lips meet.
Draw a curved shape above this line to form the upper lip. The upper lip often contains a slight dip in the center. Draw a curved line below the center line to create the lower lip. The lower lip usually appears slightly larger than the upper lip.
Mouth width often aligns with the center of each eye. This guideline helps maintain natural proportions. Small adjustments may appear depending on facial structure.
Next, draw the ears. Ears begin around the eye line and end near the bottom of the nose line. Draw simple curved shapes on both sides of the head. Do not add complex inner details during early sketches.
Basic mouth and ear tips:
• Keep lip shapes soft and simple.
• Align mouth width with eye centers.
• Draw ears between the eye and nose lines.
• Avoid heavy outlines on lips.
Step 6: Refine the face and add hair
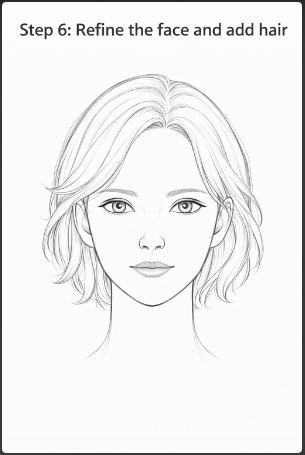
After placing all facial features, begin refining the drawing. Remove or lighten the construction guidelines. Some guidelines remain useful during refinement, so erase only when necessary.
Examine the overall face shape. Adjust the jawline if the chin appears too wide or narrow. Refine cheek curves and smooth uneven lines. Small corrections improve realism and balance.
Next, draw the hair. Many beginners draw individual hair strands first. This approach creates messy drawings. Instead, draw the general hair shape first. Hair sits above the skull and holds volume, so leave space between the hair and the head shape.
Break hair into large sections. Add smaller strands later, after the overall shape looks correct. This method creates cleaner and more natural hairstyles.
Refinement tips for better results:
• Remove extra construction lines.
• Smooth the jaw and cheek shapes.
• Draw hair in large sections first.
• Add detail only after the structure looks correct.
Related blog post: How to Draw Hair Step by Step?
Common mistakes beginners make
As you can see, many beginners repeat the same drawing mistakes. Recognizing these problems helps improve faster. The most common problem involves incorrect feature placement. When guidelines are ignored, the face becomes unbalanced.
Another frequent mistake involves drawing details too early. Beginners often draw eyelashes, wrinkles, or hair strands before finishing the basic structure. This approach makes corrections difficult later.
Typical beginner mistakes include:
• Eyes drawn too high on the head.
• Eyes drawn too close together.
• Nose drawn with strong outlines.
• Hair drawn strand by strand too early.
• Ignoring facial guidelines.
Many Artists solve these problems through structured construction and repeated practice.
How to practice face drawing effectively
Improvement comes from repetition and observation. Drawing one face slowly will not build strong skills. Drawing many faces teaches the brain to recognize patterns in facial structure.
Start with simple sketches focused on proportions. Do not worry about perfect shading during early practice. Draw ten faces using the same six-step method. Each drawing improves hand control and observation skills.
Use references while practicing. Look at photos or observe your own face in a mirror. Notice distances between features and how shadows form across the face.
Practice exercises that improve face drawing:
• Draw ten faces using the same guideline method.
• Study reference photos while sketching.
• Practice drawing different face shapes.
• Experiment with different hairstyles.
These exercises build confidence and accuracy.
Conclusion
Learning how to draw a face becomes easier when you follow a structured process. Artists start with the head shape, place guidelines, and add facial features step by step. This approach prevents proportion mistakes and creates balanced drawings.
Regular practice improves results over time. Focus on simple shapes and feature placement before details. With consistent practice, you will develop stronger observation skills and more accurate portraits.
More blog posts:


Frequently Asked Questions
Here are some FAQs related to face drawing:
What is the easiest way to draw a face for beginners?
The easiest way starts with simple shapes and guidelines. First, draw the head shape using a circle and a jawline. Next, add facial guidelines to mark the position of the eyes, nose, and mouth.
This structured method improves proportions and accuracy. Beginners who follow step-by-step construction often improve faster because each facial feature aligns with the head structure.
Where should the eyes be placed when drawing a face?
The eyes sit around the middle of the head. Many beginners place their eyes too high because they focus only on the face area instead of the full head.
Artists divide the head into two equal parts. The eye line sits halfway between the top of the head and the chin. Correct eye placement helps the entire face look balanced.
How far apart should the eyes be in a drawing?
The distance between the eyes usually equals the width of one eye. This proportion appears in most human faces and helps maintain natural spacing.
When the eyes sit too close together, the face looks crowded. When the eyes sit too far apart, the face looks distorted. Using the one eye width rule improves accuracy during early sketches.
Where should the nose be placed on a face drawing?
The bottom of the nose usually sits halfway between the eye line and the chin. Artists often draw a guideline at this point before sketching the nose.
This guideline helps position the nostrils and the nose bridge correctly. Using light lines improves flexibility during adjustments.
How do you draw realistic lips for a face?
Start with a short horizontal line to mark the center of the lips. Then draw the upper lip using a curved shape with a small dip in the center. After that, draw a curved line below for the lower lip.
The lower lip usually appears fuller than the upper lip. Keep the lines soft and avoid heavy outlines to create a more natural look.