
How to Draw Hands Step by Step for Beginners?
How to draw hands step by step for beginners becomes much easier once you understand a simple drawing process.

Many beginner artists struggle with their hands because of finger proportions, joints, and angles. Hands contain many small shapes, so drawings often look stiff or unnatural without a clear method.
This tutorial shows a simple step-by-step approach you can follow to draw hands with better structure and proportions.
Instead of guessing finger placement, you start with the basic palm shape, add finger guidelines, and build the hand gradually using simple forms.
You learn the basic hand structure, correct finger proportions, and easy techniques used by artists to sketch hands from different angles.
Each step breaks the process into clear parts, so you improve your drawing skills and gain more control when sketching hands.
Follow the steps below and practice each stage of the process. With consistent practice, your hand drawings start to look more natural and balanced.
Note: Some links in this article are affiliate links.
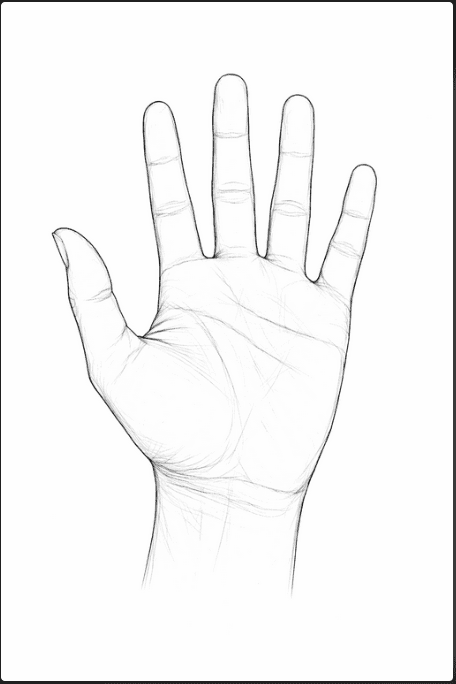
The Main Parts of the Hand
Understanding the main parts of the hand helps you draw hands with better structure and proportions. Instead of treating the hand as one complex shape, you can break it into simple sections.
This approach makes the drawing process easier and more accurate.
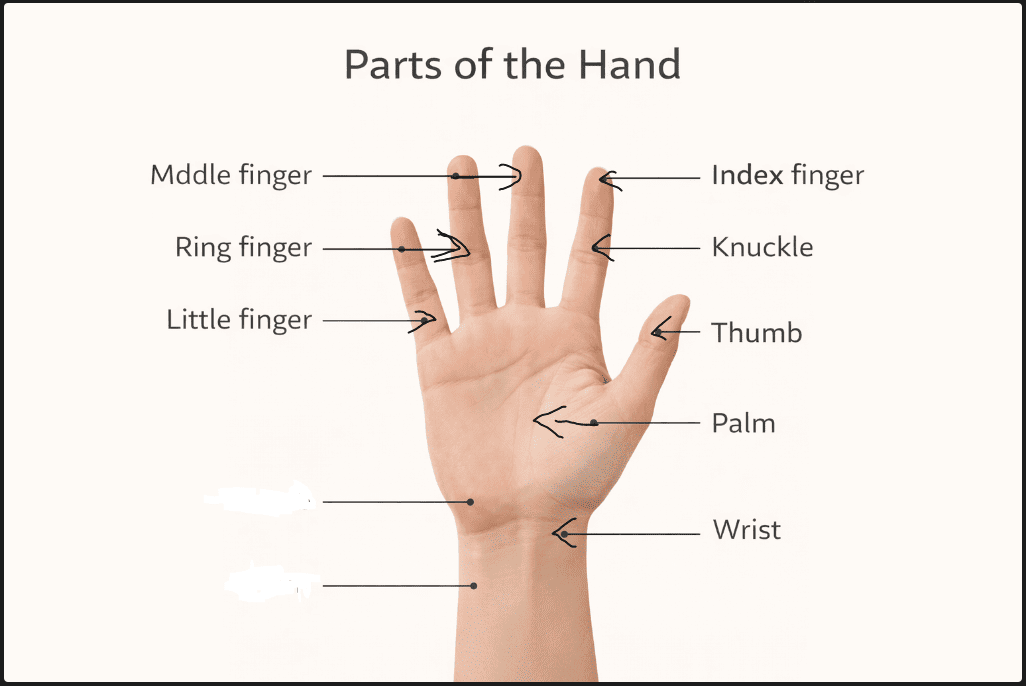
The main parts of the hand include:
• Palm: The palm forms the base of the hand and connects to the wrist. All fingers and the thumb attach to this area.
• Thumb: The thumb sits on the side of the palm and moves differently from the fingers. It contains two main segments and appears thicker than the other fingers.
• Fingers: The hand has four fingers: index, middle, ring, and pinky. Each finger contains three sections separated by joints.
• Knuckles: Knuckles appear where the fingers connect to the palm and where the joints bend. They help show the structure and movement of the hand.
By understanding these four parts, you gain a clear framework for constructing hands in your drawings. This knowledge helps you simplify the hand into manageable shapes before adding details and refining the final sketch.
Further Reading: How to Draw Lips Step by Step?
How to Draw Hands Step by Step for Beginners
Drawing hands becomes easier once you follow a clear structure. Many beginners struggle because their hands contain several moving parts, including fingers, joints, and knuckles.
The steps below guide you through the process, starting with basic shapes and slowly adding details.
Step 1: Draw the Basic Palm Shape

First, begin with the main structure of the hand by sketching the palm. Instead of focusing on fingers immediately, draw a simple square or slightly rectangular shape to represent the palm.
This shape works as the base that supports the rest of the hand.
After placing the palm shape, lightly mark where the wrist connects at the bottom. Starting with this structure helps control the overall proportions of the hand.
Next, check the size of the palm before moving forward. A common mistake occurs when the palm appears too small compared to the fingers. Keeping the palm properly sized helps the final drawing look balanced and natural.
Helpful tips for drawing the palm:
• Draw the palm slightly wider at the top than at the bottom.
• Leave enough space above the palm for the fingers.
• Keep your lines light so adjustments remain easy.
Related blog post: How to Draw Eyes Step by Step?
Step 2: Add the Thumb Base
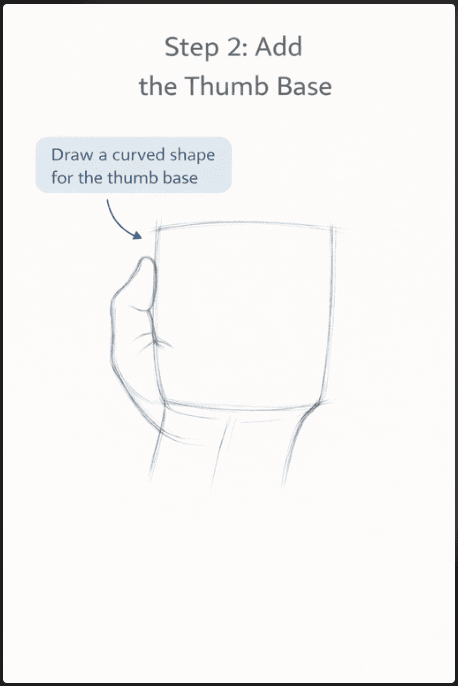
Next, add the thumb base on the side of the palm. The thumb attaches lower on the palm rather than at the same level as the fingers.
Because the thumb moves independently, placing it early helps define the hand's direction and movement. Draw a curved shape extending outward from the side of the palm.
After sketching the base, begin shaping the thumb using two main sections. Unlike the fingers, the thumb contains fewer segments and sits at an angle. Observing your own hand helps you understand this angle and place the thumb correctly.
Important points to remember when drawing the thumb:
• The thumb starts lower than the fingers.
• The thumb bends inward toward the palm.
• The base of the thumb appears thicker than the fingers.
Step 3: Draw Finger Guidelines
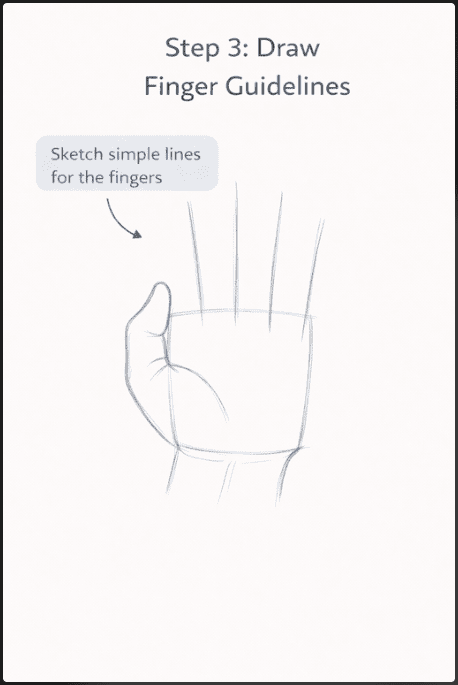
Once the palm and thumb are placed, draw simple guidelines for the fingers. These lines act as directional markers that show where each finger will sit.
Instead of drawing fingers fully at this stage, lightly sketch straight or slightly curved lines extending from the top of the palm.
Spacing between the fingers matters as much as finger length. Fingers are usually spread slightly apart rather than standing perfectly straight. Drawing guidelines first allows you to correct spacing before adding details.
Use these tips when placing finger guidelines:
• The middle finger usually sits near the center of the palm.
• The ring finger and index finger appear slightly shorter.
• The pinky finger angles outward slightly.
Step 4: Build Each Finger Shape

After placing the guidelines, begin forming the fingers using simple shapes. Each finger contains three sections connected by joints.
Instead of drawing long continuous lines, divide each finger into three small segments. These segments help you control finger length and create realistic bends.
While building the fingers, pay attention to the gradual taper from base to tip. Fingers appear thicker near the palm and thinner near the fingertips. Maintaining this taper helps the hand appear more natural.
Helpful techniques for shaping fingers:
• Draw each finger using three connected segments.
• Slightly curve the fingers instead of drawing them straight.
• Keep fingertips rounded rather than sharp.
Step 5: Add Knuckles and Joints
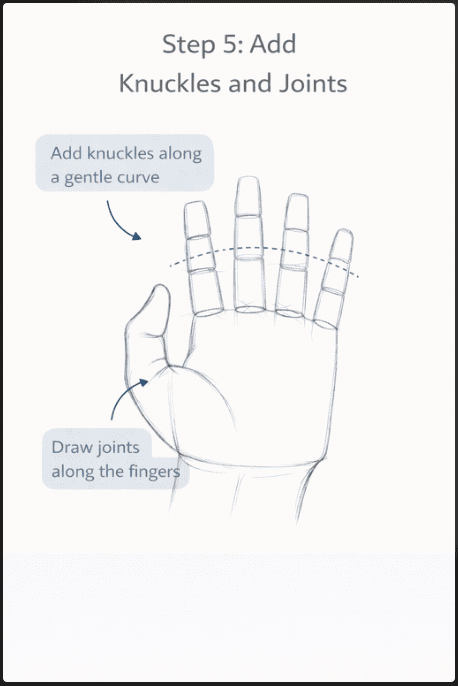
Next, place the knuckles along the top edge of the palm. Knuckles rarely form a straight horizontal line. Instead, they create a gentle curve across the hand. Marking this curve helps maintain correct finger alignment and improves the realism of the drawing.
After placing the knuckles, emphasize the joints along each finger segment. These joints indicate where the fingers bend. Adding small curved lines or slight indentations suggests the structure beneath the skin.
Focus on these details when drawing knuckles and joints:
• The knuckle line curves slightly across the hand.
• The middle finger knuckle usually appears highest.
• Finger joints create subtle bends along each finger.
Related blog post: How to Draw Hair Step by Step?
Step 6: Refine the Hand Shape

Once the basic structure is complete, begin refining the hand's outline. Replace the construction shapes with smoother lines that follow the natural curves of the fingers and palm. This step transforms the rough sketch into a cleaner drawing.
During refinement, adjust the thickness of each finger and smooth any uneven lines. Small adjustments at this stage improve the overall balance of the hand.
Use these checks while refining the drawing:
• Compare finger lengths for consistency.
• Ensure the palm connects naturally with the wrist.
• Smooth any sharp edges along the fingers.
Step 7: Add Details to the Hand
Finally, add the smaller details that complete the hand drawing. Begin with the fingernails by placing small curved shapes at the tips of the fingers.
Keep the nails subtle so they do not overpower the drawing. Then add gentle lines around the joints to suggest natural skin folds.
Details should enhance the drawing rather than overwhelm it. Light shading around the fingers and palm can also add depth and form.
Useful finishing touches include:
• Draw fingernails using small curved shapes.
• Add light lines around finger joints.
• Use soft shading to suggest depth in the palm.
Drawing Supplies for Practicing Hands
Before you start drawing hands, gather a few simple tools. Basic supplies help you focus on learning hand shapes and proportions. In addition, simple tools make practice easier and faster.
Use the following supplies when practicing hand drawings:
• Pencil: Use a graphite pencil for sketching. A pencil helps you draw light lines, and you erase and adjust shapes easily while building the hand.
• Sketchbook or drawing paper: Use a sketchbook so you can practice regularly and see your progress over time. Smooth drawing paper also helps you create cleaner lines.
• Eraser: Use an eraser to fix mistakes and refine your drawing. A soft eraser removes pencil marks without damaging the paper.
• Reference photo or your own hand: Use references so you observe real hand shapes and finger proportions. You look at your own hand or study clear reference photos while drawing.
Conclusion
Drawing hands becomes easier when you follow a clear process and practice regularly. In this guide, you learned how to draw hands step by step for beginners by starting with the palm shape, adding finger guidelines, and refining the hand with simple details.
Keep practicing by observing real hands and sketching from different angles. With time and repetition, your hand drawings will look more natural and balanced.
Continue using these steps whenever you practice, and you will gradually improve your drawing skills.
More blog posts:


Frequently Asked Questions
Here are some FAQs related to drawing hands:
How do beginners draw hands step by step?
Beginners draw hands step by step by starting with simple shapes. First, draw the palm as a square or rectangle. Next, add finger guidelines and place the thumb on the side of the palm. After that, divide each finger into small segments to build the structure. Finally, refine the outline and add small details such as fingernails and joints.
Why are hands difficult to draw?
Hands look difficult to draw because they contain many small parts and joints. Each finger moves differently, and small mistakes in proportion make the drawing look unnatural. However, when you break the hand into simple shapes and follow a clear process, drawing hands becomes easier.
What is the easiest way to practice drawing hands?
The easiest way to practice drawing hands is to observe real hands and sketch them regularly. You use your own hand as a reference and draw it from different angles. Short daily practice sessions help you understand finger proportions and improve your drawing accuracy.
How long does it take to learn to draw hands?
Learning to draw hands takes regular practice over time. Beginners usually improve quickly when they practice simple sketches every day. With consistent practice and reference studies, hand drawings start to look more natural and balanced.
Should beginners use reference photos when drawing hands?
Yes, beginners improve faster when they use reference photos. References help you see the real structure of the hand, including finger length, palm size, and joint placement. Studying real hands while drawing helps you develop better observation and drawing skills.