
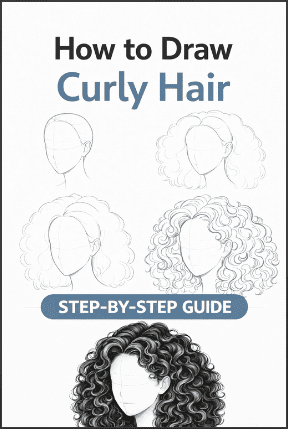
How to Draw Curly Hair Step by Step for Beginners?
Curly hair looks complex at first, yet once you understand the structure, you can draw it with control and confidence.
If you are learning how to draw curly hair, you need a simple method that focuses on shape, flow, and depth instead of random lines.
Many beginners struggle because they try to draw every strand, which leads to messy results and flat drawings.
In this article, you will follow a simple step-by-step process that helps you build volume first, then add curls in a natural way.
As you move through each step, you will see how small changes in shape and shading create realistic texture. By the end, you will know exactly how to approach curly hair without feeling stuck or overwhelmed.
Note: Some links in this article are affiliate links. We might get a small commission at no cost to you if you buy a product using our link.
What Makes Curly Hair Different to Draw
Curly hair behaves differently from straight hair, so your approach needs to change. Instead of flowing in one direction, curls move in loops and twists.
Because of this, the overall shape looks fuller and more dynamic. If you ignore this structure, your drawing will look flat and unrealistic.
Another key difference is volume. Curly hair sits away from the scalp and creates a larger silhouette. You need to focus on the outer shape first before adding any details.
When you start with individual strands too early, you lose the sense of depth.
Light and shadow also play a bigger role. Curves catch light in some areas and fall into shadow in others. This creates contrast across the hair.
If you shade evenly, the curls will disappear. Strong highlights and darker sections help define each curl group.
Finally, curly hair works best when you draw it in groups, not strands. Each section forms a chunk or pattern. When you simplify curls into larger shapes, your drawing becomes cleaner and easier to control.
Related blog post: How to Draw Hair Step by Step?
Tools You Need to Draw Curly Hair
You do not need many tools to draw curly hair well. Focus on a few essentials that give you control over lines and shading.
Pencils: Use an HB pencil for sketching the basic shapes. Then switch to 2B or 4B to add darker shadows and depth. Softer pencils help you create contrast, which is important for defining curls.
Eraser: A kneaded eraser works best for lifting highlights from the hair. You can shape it to create soft light areas on curls. A regular eraser helps clean edges and fix mistakes.
Paper: Choose smooth paper if you want clean lines and controlled shading. Rough paper adds texture, which can help with curly hair, but it makes fine details harder to manage.
Blending tool: A blending stump or a tissue helps smooth out shading. Use it lightly to avoid losing the texture of the curls.
Digital tools: If you draw digitally, use a pressure-sensitive brush with opacity control. This helps you create soft shading and sharp lines in one workflow.
I recommend that you start simple and focus on how you use each tool. Good technique matters more than having many materials.
How to Draw Curly Hair Step by Step
Curly hair gets easier to draw when you break the process into clear stages. You can start with the big shape first, then build the curls, then add depth with shading.
This approach helps you keep the hair full and natural, not messy. Here are the steps to follow:
Step 1: Sketch the head and hairline
Start by drawing the head shape and the hairline's position. Keep your lines light so you can adjust them later. This first step gives you a guide for where the hair will sit.
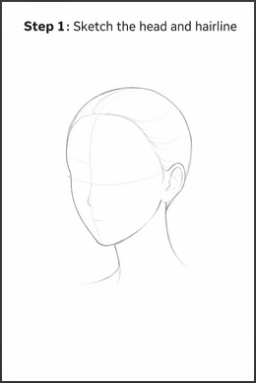
Do not draw curls yet. First, make sure the face, head, and hairline feel balanced. If the base is off, the hair will look off, too.
Step 2: Block the overall hair shape
Next, draw the outer shape of the curly hair. Think about the full silhouette, not the small details. Curly hair usually has more volume than straight hair, so let the shape sit away from the scalp.
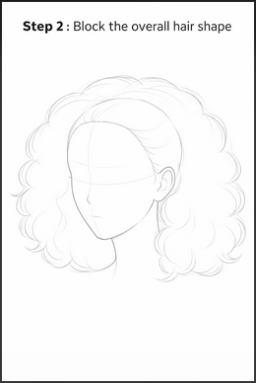
At this stage, ask yourself where the hair is widest and where it falls closer to the head. This helps you create a strong structure before you move into texture.
Related blog post: How to Draw Braids Step by Step?
Step 3: Split the hair into big sections
Now divide the hair into large sections or curl groups. For example, you might have curls framing the face, curls on top, and larger sections falling to the sides. These sections help you organize the drawing.
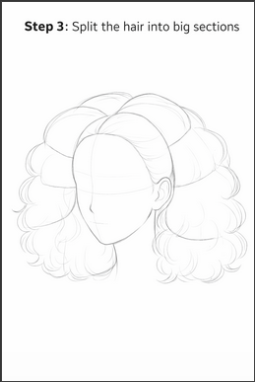
This step matters because curly hair looks better when you treat it as grouped forms. If you jump into random strands, the drawing loses shape fast.
Step 4: Draw the main curl patterns
Inside each section, draw the main curls using loose curves, S shapes, and looping lines. Keep the motion natural. Change the size and direction of the curls so the hair does not look stiff or repeated.
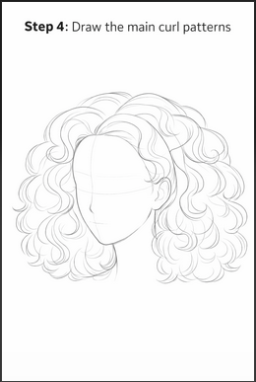
Focus on the biggest curls first. You are building the foundation of the texture here, so stay simple and leave room for smaller details later.


Step 5: Add smaller curls and overlap
Once the main curls are in place, add smaller curls between them. Let some curls overlap others. This creates depth and makes the hair feel thicker and more realistic.
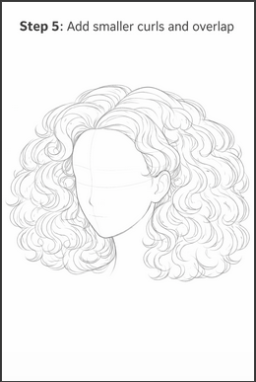
Try to avoid making every curl look the same. Real curly hair has variation. Some curls look tighter, some look looser, and some fade into shadow instead of showing a full outline.
Step 6: Shade the curls to show depth
Start shading the darker parts of the hair. Usually, shadows appear where curls turn inward, where one curl sits behind another, and near the roots or lower layers. Keep the lighter areas where the hair catches light.
This is where the curls begin to look real. Good shading shows form better than extra line work. Work in groups of light and dark areas instead of shading each curl in the same way.
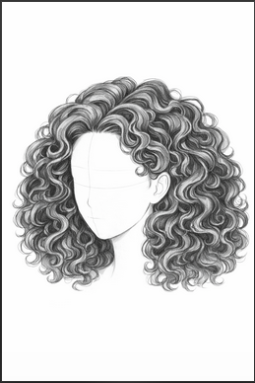
Step 7: Refine the drawing and add highlights
In the final step, clean up rough lines and strengthen the best parts of the drawing. Add highlights with an eraser if you work in pencil, or leave small light spaces if you draw digitally.
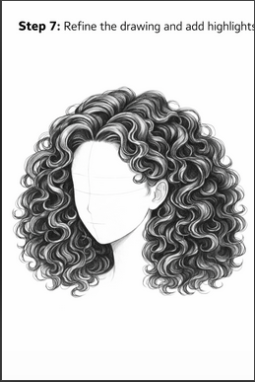
These bright areas help the curls stand out.
Look at the full drawing before you finish. Check the volume, the flow, and the contrast. Then stop once the hair looks clear and natural. Too much detail at the end can make curly hair look busy.
Quick tip before you practice
Use a real photo reference when you practice curly hair. References help you see how curls group together, where shadows fall, and how volume changes from one hairstyle to another.
This leads to better results than drawing from memory, especially as a beginner.
What to focus on first as a beginner
If you are new to drawing hair, focus on three things first: the outer shape, the main curl groups, and the shadow pattern.
These three parts do most of the work. Once you get them right, the smaller details become much easier to add.
Simple Method to Draw Curly Hair Faster
If you want to draw curly hair faster, stop thinking about individual strands first. Curly hair looks better when you build the big shape before you add any detail. This saves time and helps your drawing look more natural.
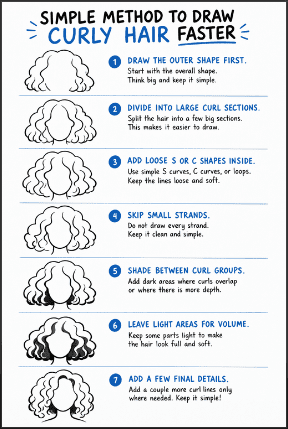
Here are some steps you need to follow:
Draw the outer shape of the hair first.
Split the hair into a few large curl sections.
Add simple S curves, C curves, or loose loops inside each section.
Skip tiny strands and keep the lines clean.
Shade the deeper areas between curl groups.
Leave some lighter spaces to show volume.
Add a few final curl lines only where needed.
A good rule is this. Draw shape first, curl groups second, details last. This method helps you work faster and keeps curly hair from looking flat or overworked.
Conclusion
Drawing curly hair becomes easier when you focus on structure before detail. You should start with the outer shape, break the hair into clear sections, and use simple curves to suggest movement.
As you can see, this approach helps you avoid overworking the drawing and keeps the curls looking natural.
Practice this method on different hairstyles and lengths. Try loose waves, tight curls, and layered hair. Each variation builds your control and improves how you place shadows and highlights.
If you follow these steps and keep your lines simple, your curly hair drawings will look fuller, cleaner, and more realistic with less effort.
More blog posts:


FAQs
Here are some frequently asked questions:
How do you draw curly hair step by step for beginners?
Start with the overall shape of the hair. Divide it into large sections, then add simple S or C curves inside each section. Add shading between groups and keep some areas light to create volume.
Why does my curly hair drawing look messy?
This usually happens when you draw too many small strands too early. Focus on big shapes and curl groups first. Keep your lines clean and only add details at the end.
How do you make curly hair look more realistic?
Use contrast. Add darker areas where curls overlap and leave lighter areas where light hits. This creates depth and makes the curls stand out.
Should I draw every curl strand?
No. Drawing every strand makes the hair look cluttered. Use a few strong lines to suggest the curls instead of drawing everything.
What is the easiest way to draw curly hair fast?
Sketch the outer shape, divide it into sections, and add a few simple curves. Skip small details and focus on shading and volume to finish quickly.
How do you shade curly hair properly?
Shade between curl groups and in deeper areas. Keep the outer curves lighter. This contrast helps define the curls and adds depth to your drawing.