How to Draw a Side Profile Step by Step for Beginners?
Learning how to draw a side profile step by step without messing up the proportions is one of the most searched drawing problems for beginners. That’s because most tutorials overcomplicate it.
You try to draw it, and something feels off. The eye looks too high, the nose sticks out too much, or the face looks flat.
This happens because a side profile follows a specific structure that most beginners do not understand yet.
In this article, you will learn how to draw a side profile step by step using a simple method based on basic shapes. You will place each feature in the right position and build a clean face from the ground up.
Note: Some links in this article are affiliate links. We might get a small commission at no cost to you if you buy a product using our link.
What You Need Before You Start
You need a few basic tools to start drawing a side profile. Use a simple pencil like HB or 2B so you can sketch lightly and adjust lines without leaving harsh marks.
Keep an eraser nearby to correct mistakes as you build your drawing. Choose plain paper with enough space to draw comfortably.
You should avoid using complicated tools at this stage. A ruler can help you place guidelines more accurately, but it is optional.
If you prefer freehand drawing, you can still get good results by focusing on proportions. I recommend starting simple, so you stay focused on structure instead of materials.
You also need a clean workspace and good lighting. This helps you see your lines clearly and improves your control.
When your setup is simple, you can focus fully on learning how to draw a side profile step by step without distractions.
Related blog post: How to Draw Curly Hair Step by Step?
Understanding Side Profile Proportions
You need to understand the basic structure of the head before you start drawing details. A side profile is not flat.
It follows the shape of the skull, which you can simplify into a circle and a jawline. This structure gives you a solid base to build on.
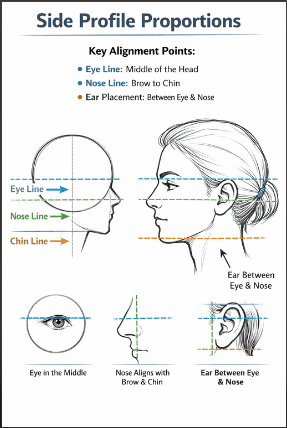
You should divide the face into sections to place features correctly. The eye sits around the middle of the head, not near the top.
The nose extends forward from the center area, and the mouth sits between the nose and the chin. These placements help you avoid common proportion mistakes.
You also need to align the ear correctly. The ear usually sits between the eye line and the bottom of the nose. If you place it too high or too low, the drawing will look off.
When you follow these simple rules, your side profile will look more natural and balanced.
How to Draw a Side Profile
In this guide, you will learn how to draw a side profile step by step using a simple and structured approach. You will start with basic shapes, place each facial feature correctly, and refine your drawing with clean lines.
Here are the steps to follow:
Step 1: Draw a Circle for the Head
You should start by drawing a light circle. This circle represents the top part of the skull and acts as the foundation of your drawing. Keep your lines soft so you can adjust them later.
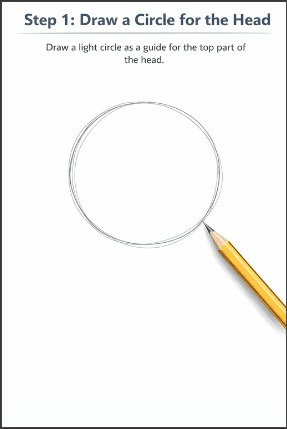
You can draw the circle slightly loose instead of aiming for perfection. The goal is to create a guide, not a final shape. If the circle is too dark, it will be harder to erase when you refine the drawing.
I recommend placing the circle slightly toward the top of your page. This gives you enough room to add the jaw and neck without crowding your drawing.
Related blog post: How to Draw a Face Step By Step?
Step 2: Add the Jawline and Chin
You need to extend a line downward from the circle to form the jaw. Then connect it back to create the chin shape. This step defines the overall look of the face.
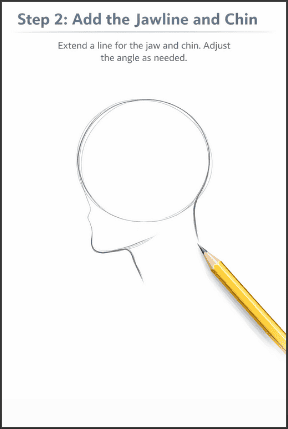
You should adjust the angle depending on the style you want. A sharper angle creates a more defined look, while a softer curve looks more natural. Try to keep the proportions balanced with the circle.
You can lightly sketch multiple variations before settling on one shape. This helps you understand how small changes affect the final result.
Step 3: Draw Guidelines
You should add guidelines to place the facial features correctly. Draw a vertical line to define the direction of the face. Then draw horizontal lines to mark where the eye, nose, and mouth will go.
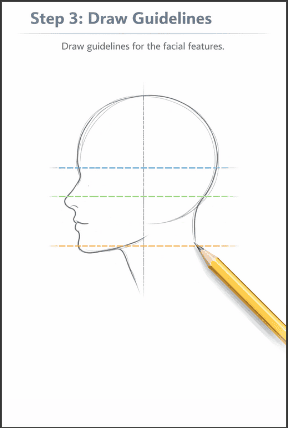
You need to keep these lines light and evenly spaced. The eye line should sit near the center of the circle. The nose and mouth lines should naturally follow the proportions below.
I recommend taking your time with this step. Clear guidelines make the rest of the drawing much easier and more accurate.
Step 4: Sketch the Nose
You can start the nose from the brow line and extend it outward. Focus on simple shapes instead of details at first. Draw the bridge, then add the tip and nostril.
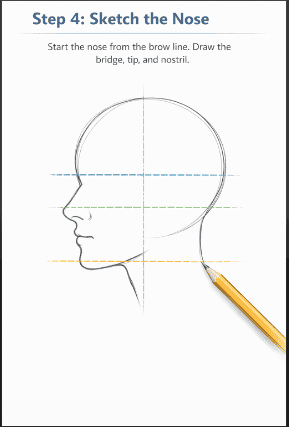
You should avoid making the nose too long or too short. Keep it aligned with your guidelines so it fits naturally within the face structure.
You can refine the shape later once the rest of the face is complete. For now, focus on placement and proportion.
Step 5: Add the Lips
You need to place the lips between the nose and the chin. Start with simple lines to define the upper and lower lips. Do not overcomplicate the shape at this stage.
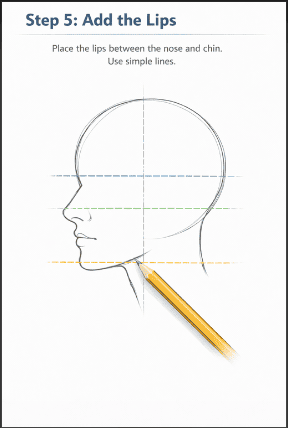
You should keep your lips slightly forward but not too far out. If they extend too much, the face will look unbalanced. Use your guidelines to keep everything aligned.
I recommend drawing the lips in a relaxed position. This makes the profile look more natural and easier to refine later.
Step 6: Draw the Eye
You should draw the eye along the center guideline. Use a simple almond shape and adjust it to fit the side view. Add a slight curve to the eyelid.
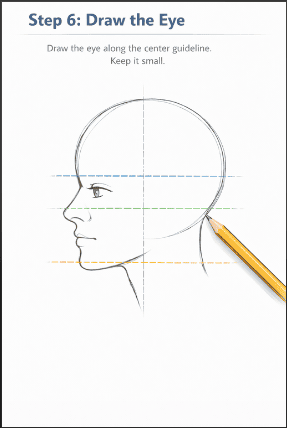
You need to keep the eye smaller than you might expect. Many beginners draw the eye too large, which makes the face look unrealistic.
You can add an eyebrow above the eye to complete the area. Keep the shapes simple, so you maintain clean proportions.
Step 7: Draw the Ear
You should place the ear between the eye line and the nose line. This placement keeps the proportions accurate and balanced.
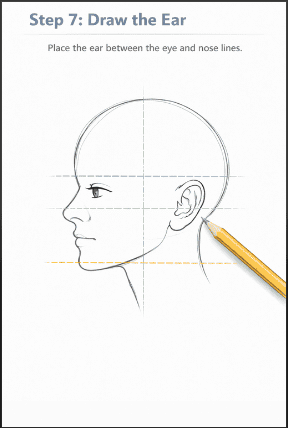
You can draw the outer shape first, then add minimal inner details. Avoid adding too much detail at this stage, as it can distract from the overall structure.
I recommend checking the alignment before moving on. A well-placed ear improves the realism of your side profile.
Step 8: Outline the Neck
You need to draw the neck starting from the jaw and the back of the head. The front of the neck should angle slightly forward.
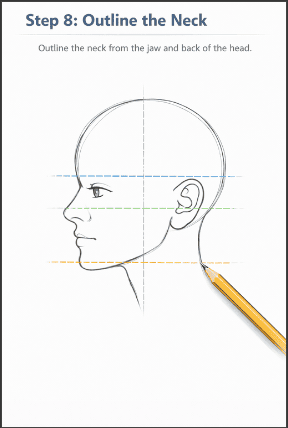
You should avoid drawing the neck straight down. A slight angle makes the posture look more natural and realistic.
You can keep the lines simple and clean. The goal is to support the head structure without overcomplicating the drawing.


Step 9: Refine the Drawing
You should go over your sketch and clean up the lines. Remove guidelines and adjust any shapes that look off.

You need to smooth the contours of the face and improve the transitions between features. This step brings the drawing together.
I recommend adding small details only after the structure looks correct. Focus on clarity and balance instead of adding too much complexity.
Step 10: Add the Hair
You should start by outlining the overall shape of the hair, not individual strands. Think of the hair as a mass that sits on top of the skull.
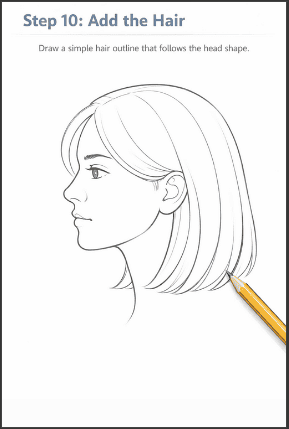
Follow the head shape you already drew, then extend slightly outward to give the hair some volume.
You need to avoid drawing hair directly on the skull line. Hair always has thickness, so leave a small gap between the head and the outer hair outline. This simple adjustment makes your drawing look more natural and less flat.
I recommend adding details only after the main shape looks correct. Use light strokes to suggest direction and flow instead of drawing every strand. Focus on clean lines and clear structure, and your side profile will look much more realistic.
Common Mistakes to Avoid
You should watch out for incorrect eye placement. Many beginners place the eye too high, which throws off the entire face. Always check that it sits near the center of the head.
You need to pay attention to the nose and jaw proportions. A nose that is too long or a jaw that is too sharp can make the profile look unnatural. Keep these elements balanced with the rest of the face.
You should also avoid flat drawings. A side profile needs depth, even in simple sketches. Use slight curves and angles to give the face a natural form.
Easy Tips to Improve Your Side Profile Drawings
You should practice using reference images. This helps you understand how real faces are structured and improves your accuracy over time.
You can start with simple shapes before adding details. This approach keeps your drawing clean and prevents mistakes early in the process.
I recommend repeating the same drawing multiple times. Each attempt helps you refine your understanding of proportions and improve faster.
FAQ Section
Here are some frequently asked questions:
How do you draw a side profile for beginners?
You should start with a circle and add a jawline to build the head shape. Then, place guidelines to position the facial features correctly. This method keeps your drawing structured and easy to follow.
You need to focus on proportions before details. When the placement is correct, the drawing will look more natural even without shading.
I recommend practicing step by step until the process feels comfortable. Consistency improves your results over time.
What is the easiest way to draw a side face?
You can simplify the process by using basic shapes and clear guidelines. This removes guesswork and helps you place features accurately.
You should avoid jumping into details too early. Start simple, then refine the drawing once the structure is correct.
I recommend focusing on one feature at a time. This keeps the process manageable and improves accuracy.
Why does my side profile look wrong?
You may be placing features in the wrong positions. Common issues include high eyes, long noses, or misaligned ears.
You should check your guidelines and adjust proportions before adding details. Small corrections can fix most problems.
I recommend comparing your drawing with a reference. This helps you spot mistakes quickly.
How long does it take to improve?
You can see improvement within a few days if you practice consistently. Short daily sessions work better than long sessions once in a while.
You should focus on understanding the structure rather than rushing through the drawings. This builds a strong foundation.
I recommend tracking your progress by keeping your old sketches. This helps you see how much you improve over time.
Conclusion
As you can see, you should focus on building a strong foundation with simple shapes and correct proportions. This approach makes the process easier and more effective.
You can improve your results by practicing regularly and correcting mistakes early. Small adjustments lead to better drawings over time.
I recommend continuing with similar tutorials to strengthen your skills. The more you practice, the more natural drawing side profiles will feel.
More blog posts: