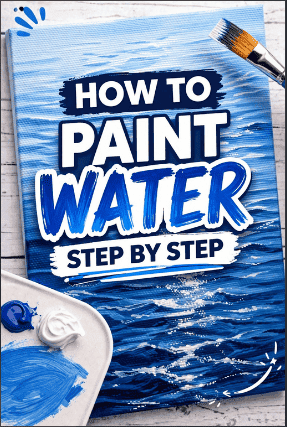
How to Paint Water Step By Step with Acrylic?
If you want to learn how to paint water step by step, you have come to the right article.
Water is one of the hardest things to paint, and most beginners get stuck at the same point. The colors look flat, the reflections feel off, and the final result does not look like water at all.
If you have tried before and felt frustrated, you are not alone.
The good news is you do not need advanced skills to fix this. You need a clear method that shows you exactly what to paint and in what order. Once you understand how light, color, and movement work together, painting water becomes much easier.
In this step-by-step guide, you will learn how to paint water with acrylic using simple techniques that beginners can follow.
You will start with a basic layer, build depth with darker tones, and finish with highlights that make the water look realistic. By the end, you will have a process you can repeat for lakes, oceans, or any water scene.
Note: Some links in this article are affiliate links.
Materials You Need to Paint Water
You do not need many tools to paint water, but you should choose the right basics. I recommend keeping your setup simple so you can focus on technique.
Here are some of the main materials you will need:
Acrylic paints: You need a few key colors, including Titanium White, Ultramarine Blue, Phthalo Blue, and Payne’s Gray. You should mix these to create depth and variation.
Brushes: You need a flat brush for base layers and a round brush for details. You can add a fan brush for softer textures.
Painting surface: You can use canvas for finished work or acrylic paper for practice. I recommend acrylic paper if you are a beginner.
Palette: You need a surface to mix your colors. A simple plastic or flat palette works well.
Water container: You need clean water to rinse your brushes. You should change it often to keep the colors clean.
Once you have these materials ready, you can move on to the painting process with confidence and better control over your results.
Related blog post: How to Paint Clouds Step by Step?
Understand How Water Looks Before You Paint
Before you start painting, you need to understand what you are trying to recreate. Water does not have a fixed color. It reflects the sky, nearby objects, and light conditions.

You should observe real references. Look at photos of lakes or oceans and notice these points:
Water reflects light, so you will see bright highlights on the surface.
Deeper areas look darker, especially where light does not reach.
Movement creates ripples and waves, which break up reflections.
Colors shift between blue, gray, and even green depending on the environment.
If you keep these observations in mind, your painting will look more natural and realistic.
How to Paint Water Step By Step
In this section, you will follow a simple step-by-step process to paint water with acrylic. You will build the painting in layers so you can create depth, movement, and realistic highlights without confusion.
Here are the steps to follow:
Step 1: Paint the Base Layer

You should start by creating a smooth and simple base layer. This step sets the tone for the entire painting, so you need to keep it clean and balanced.
Mix Ultramarine Blue with a small amount of Titanium White to create a light blue shade.
Use a flat brush and apply the paint using horizontal strokes. You need to keep your strokes consistent because water naturally flows sideways. If your strokes go in different directions, the surface will not look like water.
You should cover the entire area evenly, but do not worry about perfection. Small variations in tone will help later when you add depth. Try to avoid thick paint at this stage, because thinner layers are easier to build on.
Let the base layer dry before moving to the next step. Acrylic paint dries fast, so you can move forward quickly without waiting too long.
Related blog post: 13 Acrylic Painting Ideas on Canvas for Beginners.
Step 2: Add Depth with Darker Tones
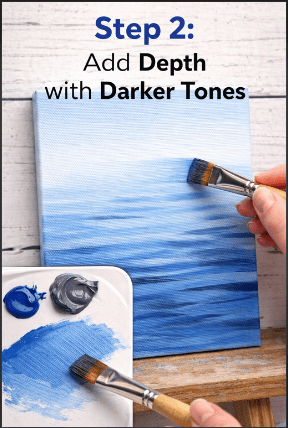
Now you need to create depth so the water does not look flat. Mix Ultramarine Blue with Payne’s Gray to get a darker shade. This color will represent deeper areas and shadows.
You should apply this darker tone in selected areas, not everywhere. Focus on places where water dips or where waves start to form. Keep your strokes horizontal and slightly uneven to create a natural look.
Blend the darker areas gently into the base layer. You need to keep some separation between light and dark zones. If you over-blend, you will lose contrast, and the water will look dull.
Step back and look at your painting from a distance. You should see variation between lighter and darker areas. This contrast is what gives the illusion of depth.
Step 3: Create Movement with Brush Strokes
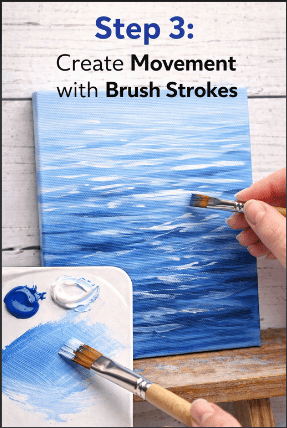
At this point, you need to show how the water moves. Movement is what makes water look realistic instead of flat.
Use a flat or round brush to add more defined strokes. You should vary the length and thickness of each stroke. Some lines need to be longer, while others stay short and broken.
Add slight curves to some strokes to suggest ripples or small waves. You do not need perfect shapes. Natural water always looks irregular, so you should avoid repeating patterns.
Focus on the direction of movement. If you are painting a calm lake, keep the strokes soft and straight. If you are painting waves, you should add more variation and energy to your brushwork.
Step 4: Paint Highlights and Reflections
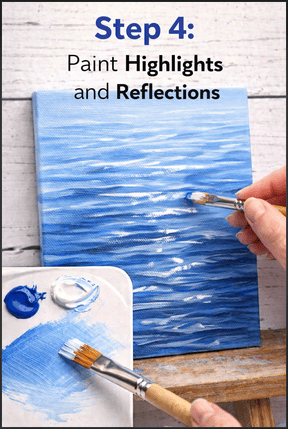
Highlights are essential if you want your water to look realistic. This step adds light and brings the painting to life.
Use Titanium White or mix white with a touch of blue. You should apply highlights in thin, broken lines instead of solid strokes. Place them where light would naturally hit the surface.
Focus on the tops of waves and areas where the light reflects strongly. You need to keep your hand light and controlled. Too much pressure will create thick lines that look unnatural.
Step back often and check your placement. Highlights should enhance the painting, not dominate it. If you use too much white, the water will lose depth.


Step 5: Add Details Like Ripples and Foam
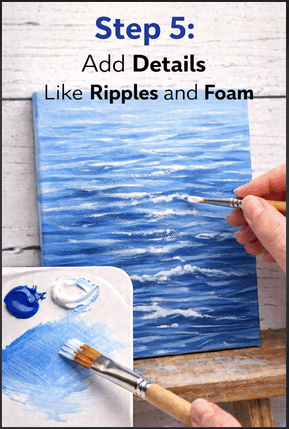
Now you can refine your painting with smaller details. This step helps make the water feel more dynamic and complete.
Use a small round brush to add ripples. You should paint short, thin lines and small marks across the surface. Keep them subtle and spaced out.
If you are painting waves, you can add foam using white paint. Apply it in irregular shapes along the edges of waves. You should soften some parts slightly so the foam blends into the water.
Look at your painting as a whole and adjust where needed. You can add a few darker accents or extra highlights to improve balance.
Take your time with this step. Small details make a big difference, but only if you place them carefully.
Common Mistakes When Painting Water
Many beginners repeat the same mistakes. You should avoid the mistakes below to improve faster and get more realistic results.
Here is what you should avoid:
Using one flat color: Water is never a single color. You need to mix light and dark tones to create depth and variation.
Adding too much white: White is useful for highlights, but you should use it sparingly. Too much white makes the water look flat and unrealistic.
Ignoring reflections and light direction: Water reflects the sky and surroundings. You need to follow a clear light direction to make your painting look natural.
Over-blending: Blending too much removes texture and movement. You should keep some visible brush strokes to show the flow of water.
If your painting looks flat, you need to increase the contrast between light and dark areas.
Frequently Asked Questions
Here are some FAQs about water painting:
What colors do you use to paint water with acrylic?
You should use a mix of blue, white, and gray tones. Ultramarine Blue, Phthalo Blue, and Payne’s Gray work well for most water scenes.
How do you paint realistic water reflections?
You need to mirror the shapes above the water with softer, slightly blurred strokes. Keep reflections vertical and blend them gently.
Is painting water hard for beginners?
It can feel difficult at first, but you can improve quickly if you follow a clear, step-by-step process and practice regularly.
How do you paint clear water vs ocean water?
Clear water needs lighter tones and softer details. Ocean water requires stronger contrast, deeper blues, and more visible movement.
Conclusion
As you can see, you now have a simple process to paint water with acrylic step by step. If you focus on layering, contrast, and brush control, your results will improve with each painting.
I recommend that you start with simple scenes, practice often, and adjust your technique based on what you observe.
More blog posts: