How to Draw a Body Step by Step for Beginners
Learning how to draw a body step by step is one of the most searched skills for beginners who want to improve their drawing fast.

If you struggle with proportions, stiff poses, or don’t know where to start, this guide gives you a clear process you can follow from your first sketch.
You will learn how to break the human body into simple shapes, build correct proportions, and turn basic lines into a clean full-body drawing.
Each step is easy to follow and designed for beginners, so you don’t need any anatomy knowledge to get started. By the end, you will be able to sketch a full body with better balance, structure, and confidence. So let’s get right into it.
Tools You Need to Draw a Body
You can start with a simple pencil and paper. These are enough to learn all the basics. I recommend keeping your tools simple so you can focus on drawing.
You should use a pencil that allows light sketching, like an HB. This makes it easier to fix mistakes. You can go darker once your structure looks correct.
I recommend using a sketchbook to track your progress. Seeing your improvement over time keeps you motivated and consistent.
You can try digital tools later for more flexibility. The process stays the same, so focus on fundamentals first.
Related blog posts: How to Draw Shoes Step by Step?
How to Draw a Body Step by Step
How to draw a body step by step becomes easier when you follow a clear structure. You should focus on simple shapes and build the figure gradually instead of jumping into details.
This approach helps you keep correct proportions and avoid common mistakes.
Here are the steps to follow:
Step 1. Draw a simple head shape
You should start with a simple circle or oval because this shape sets the scale for the entire body. If the head is too big or too small, the rest of the drawing will look off.
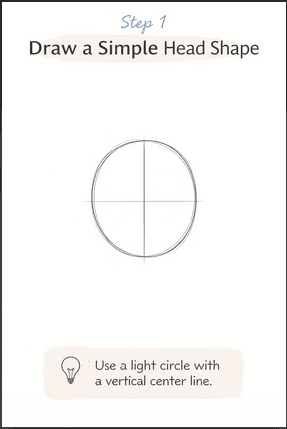
I recommend keeping your lines light so you can adjust the size easily.
You can add a vertical center line inside the head to guide alignment. This line helps you keep the body straight and balanced as you build downward. It also helps later when you place facial features.
You should avoid adding details at this stage. Focus only on the basic shape and placement. A clean foundation makes every next step easier.
Step 2. Sketch the spine and center line
You can draw a simple line starting from the head, going down. This line represents the spine and defines the posture of your figure. A straight line creates a neutral pose, while a curved line adds movement.
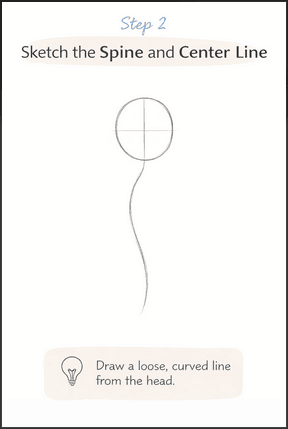
I recommend experimenting with different curves to understand how posture affects the body's appearance. Even a small curve can make the pose feel more natural.
You should keep this line loose and flexible. Do not press too hard, since you may need to adjust the pose as you build the body.
Step 3. Add the ribcage and pelvis
You should draw two simple shapes to represent the torso. Use an oval for the ribcage and a smaller shape for the pelvis. These shapes help you understand the structure before adding details.

You can tilt these shapes slightly to create more dynamic poses. For example, if the ribcage tilts one way and the pelvis tilts another, the body will look more natural.
I recommend leaving a small gap between these shapes. This gap represents the flexibility of the torso and prevents your drawing from looking stiff.
Step 4. Draw the shoulders and hips
You can add horizontal lines across the ribcage and pelvis to show the direction of the shoulders and hips. These lines guide the balance of your figure.
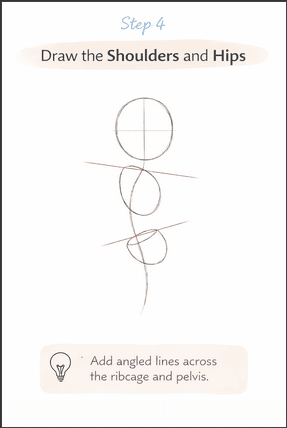
You should pay attention to the angles. If both lines are perfectly straight, the pose will look stiff. Slight angles create a more natural and relaxed look.
I recommend comparing the width of the shoulders and hips. In most cases, shoulders are wider, so you should reflect that in your sketch.


Step 5. Sketch the arms using simple lines
You can draw the arms using straight or slightly curved lines from the shoulders. Break each arm into two parts: the upper arm and the forearm.
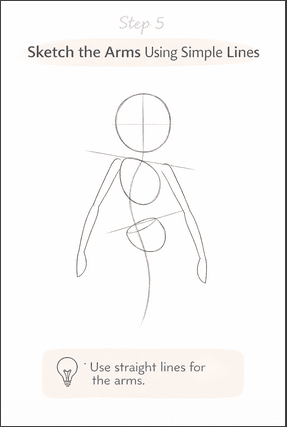
You should mark the elbows around the waist level. This helps you maintain correct proportions. Then extend the lines down to where the hands will be.
I recommend keeping the arms simple at this stage. Focus on placement and length instead of details. This makes it easier to fix mistakes early.
Step 6. Add the legs with basic proportions
You can draw the legs starting from the pelvis. Use two lines for each leg, one for the upper part and one for the lower part.
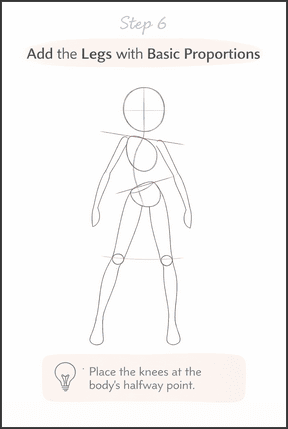
You should place your knees around the middle of your body. This helps you keep the legs proportional to the torso.
I recommend checking the overall height. The legs should be longer than the torso in most cases. Adjust your lines if needed before moving forward.
Step 7. Connect the shapes into a full body
You can now start connecting all the shapes and lines. Turn simple lines into basic forms like cylinders and blocks.

You should focus on the overall silhouette. Make sure the body looks balanced and natural before adding details.
I recommend stepping back and reviewing your drawing at this stage. Small adjustments here can improve the final result a lot.
Step 8. Refine the outline and add details
You can clean up your sketch by removing extra lines and sharpening the outline. This step brings your drawing together.
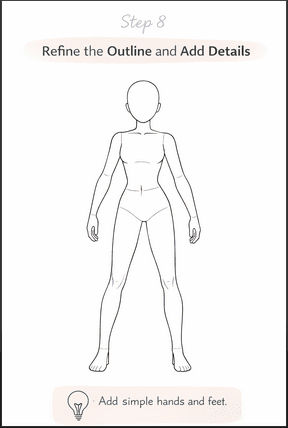
You should start adding simple details like the neck, hands, and feet. Keep them basic if you are still learning.
I recommend refining slowly and checking proportions again. This helps you avoid mistakes before finishing your drawing.
Why Learning Body Proportions Matters
You should understand proportions because they control how realistic your drawing looks. Even small errors can make the figure look unnatural.
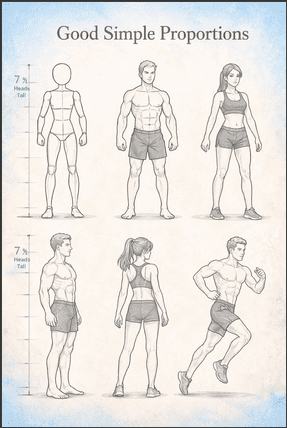
You can improve faster when you follow consistent proportions. This allows you to repeat the same structure in every drawing.
I recommend focusing on proportions early instead of details. This builds a strong foundation for all your future drawings.
You should also study common mistakes. For example, beginners often draw arms too short or heads too large. Recognizing these errors helps you fix them faster.
Common Mistakes When Drawing a Body
You should avoid skipping the basic structure because it controls proportions and balance. When you start with details, your drawing often looks off and becomes harder to fix. I recommend building the body with simple shapes first, then adding details after.
You can make your drawings look stiff if you ignore movement. A body needs a clear flow line to feel natural. You should always start with a gesture or spine line to guide the pose. I recommend practicing quick gesture sketches to improve this.
You should check symmetry because perfect balance rarely looks natural. Slight differences in shoulders, hips, and limbs make the pose feel more realistic. I recommend stepping back or flipping your drawing to spot mistakes faster.
You should also avoid rushing. Take time to check proportions before moving forward. Fixing small errors early saves you time later.
Related blog post: How to Draw a Side Profile Step by Step?
Simple Practice Exercises for Beginners
You can improve by doing quick sketches every day. Short sessions help you build confidence and speed. I recommend focusing on structure instead of details during these exercises.
You should repeat the same pose a few times. This helps you notice mistakes and improve accuracy. Each attempt will feel easier and more natural.
You can use grids when proportions feel difficult. They give you a clear guide and help you place body parts correctly. I recommend using them as a learning tool, not a habit.
You should also draw from different angles. This improves your understanding of the body in space and makes your drawings more flexible.
FAQ About Drawing a Body
Here are some frequently asked questions:
How long does it take to learn body drawing?
You can see improvement in a few weeks with consistent practice. Your progress depends on how often you draw.
You should focus on fundamentals first. This speeds up your learning process. I recommend setting small goals for each session. This keeps you focused.
What is the easiest way to draw a body?
You can follow a step-by-step method using simple shapes. This reduces confusion. You should avoid starting with details. Structure always comes first.
I recommend practicing the same method until it feels natural.
Should you learn anatomy first?
You can start with basic proportions before studying anatomy. This builds a strong base. You should add anatomy later to improve realism.
I recommend learning gradually instead of trying to master everything at once.
Is tracing good for beginners?
You can use tracing to understand shapes and proportions. It helps you see how forms connect.
You should not rely on tracing alone. Combine it with freehand drawing.
I recommend using tracing as a learning tool, not a shortcut.
Conclusion
You can improve your drawing skills by following a clear step-by-step process. Focus on structure before details.
You should practice regularly and review your work. This helps you identify areas to improve.
I recommend trying different poses and styles after you learn the basics. This builds confidence and creativity.
You can continue developing your skills by studying references and drawing daily. Consistency leads to steady progress.
More blog posts: