
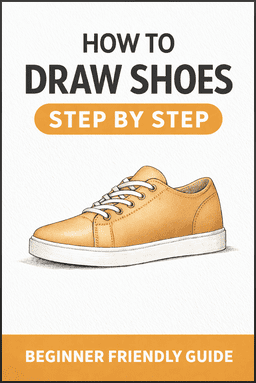
How to Draw Shoes Step by Step for Beginners?
If you have ever tried to draw a shoe and ended up with a shape that looks flat, awkward, or uneven, you are not the only one.
Learning how to draw shoes step by step gets much easier once you break the shoe into simple parts and follow a clear process.
In this guide, you will learn how to build the shape, place the sole, add laces, and finish your drawing with clean details.
Shoes are one of the best things to practice if you want to get better at sketching fashion items, character outfits, or everyday objects.
The challenge comes from the curves, angles, and small details, but each part is easier than it looks when you take it one step at a time.
Keep reading, and you will see how to turn a basic outline into a shoe drawing that looks clean, balanced, and realistic.
Note: Some links in this article are affiliate links.
Tools You Need for Drawing Shoes
Before you start, you should keep your tools simple. I would say a pencil, eraser, paper, and a sharpener are enough for a solid shoe drawing.
You do not need expensive supplies to get good results, especially if you are still learning the basics.
I recommend using an HB pencil for the first sketch because it gives you light lines that are easy to fix. Then you can use a 2B pencil for darker outlines and light shading.
If you want to add color at the end, colored pencils or markers work well, but they are optional.
You should also use a clear reference photo. This helps you see the real shape of the toe, sole, heel, and laces.
If you are a beginner, start with a simple sneaker in side view because it is easier to sketch and easier to understand.
Related blog post: How to Draw Curly Hair Step by Step?
How to Draw Shoes Step by Step
The best way to draw shoes is to build them in steps. You should not start with details like laces or stitching. First, get the main shape right. Then add structure, details, and shading.
Here are the steps you need to follow to draw shoes:
Step 1: Choose Your Shoe Type
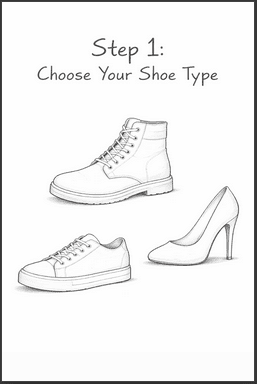
First, decide what kind of shoe you want to draw. A sneaker is usually the easiest choice for beginners because it has a clear shape and familiar details.
Boots and heels are more advanced, so I recommend saving those for later.
You should also choose a simple angle. A side view works best because you can see the full outline without dealing with hard perspective. This makes the drawing easier to plan from the start.
Before you begin, study your reference for a moment. Look at the length of the shoe, the curve of the toe, and the height of the heel. This quick check helps you draw with more accuracy.
Step 2: Draw the Basic Outline
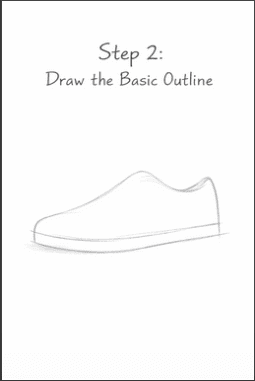
Start by sketching the outer shape of the shoe. Draw the top curve first, then add the bottom line for the sole. Keep the lines loose and light because this is only the base.
You should focus on the overall shape here, not the small details. If the shoe is too short, too high-heeled, or too flat, the final drawing will not look right. So take your time and compare the shape to your reference.
Once the outline feels balanced, you can move on. A strong outline makes the rest of the drawing much easier.
Step 3: Add the Toe and Heel
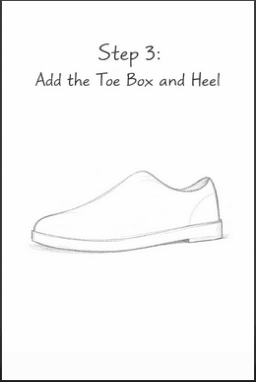
Now shape the front and back of the shoe. The toe box should have a soft curve, while the heel should give the shoe support and balance. These two areas help define the whole form.
Beginners often make the toe too sharp or too flat. I recommend checking how the front curves into the sole. A natural curve makes the shoe look more realistic.
The heel should also match the rest of the shoe in height and thickness. When both ends look right, the drawing starts to feel more solid.
Step 4: Sketch the Opening and Tongue
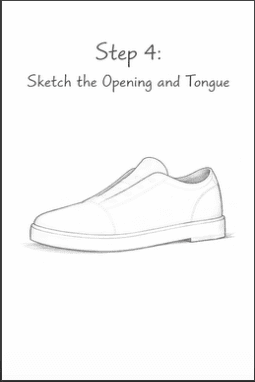
Next, draw the opening where the foot goes. This line should follow the angle of the shoe and sit naturally inside the top outline. It helps define the upper part of the design.
If you are drawing a sneaker, add the tongue in the center. The tongue should rise slightly above the opening and fit neatly between the lace sections. Keep the shape simple at first.
You should check the spacing in this area before moving on. If the opening is too wide or the tongue is too tall, the shoe can look awkward.
Step 5: Draw the Sole
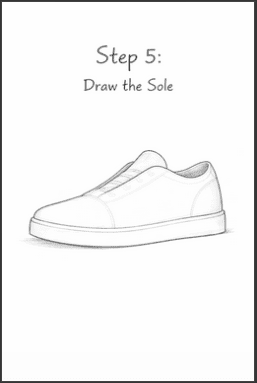
The sole gives the shoe structure, so you should make this part clear. Add thickness under the bottom line to turn the flat outline into a more realistic form. This instantly makes the shoe look more complete.
I recommend separating the upper part of the shoe from the sole with a clean line. In many sneakers, the sole has a smooth band that wraps around the bottom edge.
Check the thickness from front to back. If the sole looks uneven without a reason, the drawing can feel off.
Step 6: Add Laces and Eyelets
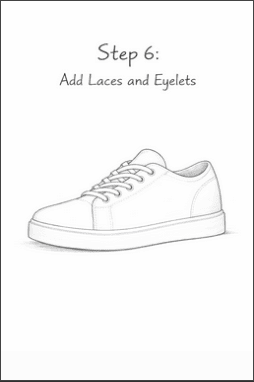
Now place the eyelets along both sides of the opening. Try to space them evenly so the lace area looks tidy and balanced. Even simple eyelets help the shoe feel more believable.
Then draw the laces with soft, curved lines. Laces should not look stiff. They should bend slightly as they cross from one side to the other.
I recommend drawing them lightly first. This helps you fix spacing and shape before you darken the final lines.
Step 7: Clean Up the Drawing
Once all the main parts are in place, erase extra guidelines. Then refine the edges of the toe, heel, opening, and sole. This is where your rough sketch starts to look finished.
You should strengthen the lines that matter most and remove anything distracting. Clean line work makes the drawing easier to read and more polished.
If something still looks off, fix it now before adding texture or shading. A clean structure always matters more than extra detail.
Step 8: Add Small Details
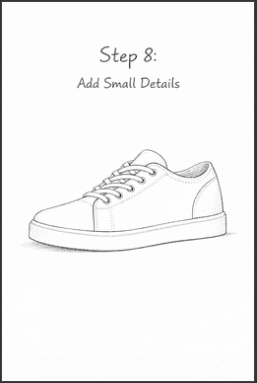
Now you can add stitching, panel lines, and sole texture. These details help the shoe look more realistic and more interesting. Still, you should keep them controlled and not overdo them.
I recommend following the real construction of the shoe. Stitching should wrap around panels, and texture should sit where it makes sense, especially on the sole.
Add the larger details first, then the smaller ones. This keeps the drawing organized and easier to manage.


Step 9: Shade the Shoe
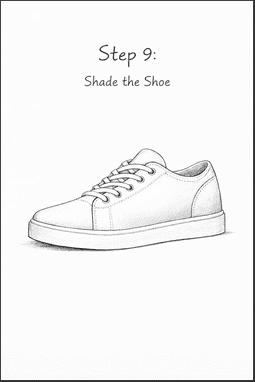
Shading helps the shoe look three-dimensional. First, decide where the light is coming from. Then darken the areas under the sole, around the laces, and under the tongue.
You should build the shading slowly. Light layers usually look better than heavy dark patches. This gives you more control and keeps the drawing clean.
I recommend adding a soft shadow under the shoe, too. This helps place it on the ground and adds depth.
Step 10: Add Color if You Want
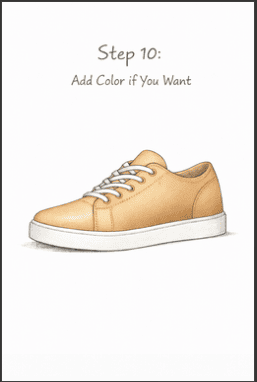
If you want to finish the drawing with color, start with the main sections first. Add one base color for the body, then use smaller accent colors for the sole, laces, or logo areas.
You should keep the color palette simple, especially if the shoe already has many details. Too many colors can make the drawing feel busy.
Even with color, the drawing should still rely on strong lines and clear structure. Color works best when the base sketch is already solid.
Tips to Make Your Shoe Drawing Look Better
You should start with simple shoe styles and simple views. A side view sneaker teaches you more than a complex shoe drawn from a hard angle. Once you get comfortable, you can try more advanced designs.
It also helps to break the shoe into simple shapes before you think about the details. This keeps the drawing under control and makes mistakes easier to fix.
I recommend studying real shoes often. The more closely you look at shape, proportion, and details, the better your drawings will become.
Related blog post: How to Draw Roses Step by Step?
Common Mistakes to Avoid
One common mistake is drawing the shoe too flat. Shoes need thickness in the sole and shape in the upper part, or they look stiff and unrealistic.
Another mistake is adding details too early. If the main outline is wrong, laces and stitching will not save the drawing. You should build the form first, then add details later.
Beginners also press too hard too soon. Light sketch lines are better because they are easier to adjust and keep the page cleaner.
Conclusion
Learning how to draw shoes step by step gets easier when you keep the process simple. Start with the right tools, choose a clear reference, and build the shoe one part at a time.
You should focus on the outline first, then add structure, details, and shading. This approach helps you stay organized and improves your results.
With regular practice, you will get better at drawing shoes that look clean, balanced, and realistic.
More blog posts:


FAQs
Here are some frequently asked questions about drawing shoes:
How do you draw shoes step by step for beginners?
To draw shoes step by step, start with a simple side-view outline. Then add the toe box, heel, opening, tongue, sole, laces, and small details. After that, clean up your lines and add light shading to make the shoe look more realistic.
What is the easiest type of shoe to draw?
The easiest type of shoe to draw is a simple sneaker in side view. This angle helps you see the full shape clearly, so you can focus on the outline, sole, and laces without dealing with hard perspective.
What tools do you need to draw shoes?
You only need a few basic tools to draw shoes well. A pencil, eraser, paper, and a sharpener are enough to get started. You can also use colored pencils or markers later if you want to add color to your shoe drawing.
How do you make a shoe drawing look realistic?
To make a shoe drawing look realistic, focus on the shape, proportions, and small details. You should use a clear reference photo, keep your lines clean, and add soft shading around the sole, tongue, and lace area to create depth.
Why does my shoe drawing look flat?
A shoe drawing often looks flat when the sole has no thickness or the shading is missing. To fix this, define the sole clearly, shape the toe and heel carefully, and add shadows under the shoe and around overlapping parts.